Additional Integrations to 3rd Party Platforms & Applications
- Ongage OngageConnect
- Stepin\ Shashin Petel
- Pratik Upadhyay
Table of Contents:
Zapier
What is Zapier
- Zapier is a web automation app. With Zapier you can connect different web applications and automate workflows. Zapier is designed to move data between different web apps automatically.
- A Zap is a blueprint for a task you want to do over and over again. A Zap looks like this: "When I get a new thing in A, do this other thing in B." The first part is the Trigger and the second part is the Action.
- Zapier supports hundreds of apps. You can mix and match triggers and actions to automate just about anything.
- An example might be "When I get a new lead in one of my applications (Website, Facebook, Salesforce) add that lead as a new contact to a selected list in Ongage."
- Every 10-15 minutes, Zapier regularly checks your trigger for new data. When the Zap triggers, Zapier automatically performs the action you requested it to do (e.g., add contact to list).
For more information about Zapier see: What is Zapier? And Zapier Apps to explore.
Zapier in a nutshell
- Integrate: Link your web apps, so they can share data.
- Automate: Pass info between your apps with workflows called Zaps.
- Innovate: Build processes faster and get more done—no code required.
Methods currently supported in the Ongage Zap
- Add/Update a contact in your Ongage list
- In the UI this is equivalent to: List → Contacts Manager → Add Member
- In the API this is equivalent to: POST /api/v2/contacts
- Send a transactional email
- In the API this is equivalent to: POST /api/notify_transactions
- See About Transactional Mailings for more info in general on this topic.
- Change a contact's status (or remove a contact from your list)
- In the API this is equivalent to: POST /api/v2/contacts/change_status using one of the change_to parameter values: "resubscribe" / "unsubscribe" / "remove" / "bounce" / "complaint" / "soft_bounce"
- Add/Remove contacts from a suppression list
- In the API this is equivalent to: POST/api/suppression
- Currently only MD5 type suppression lists are available to configure with integration.
- It is also possible to use Ongage API With Zapier see "Using the Ongage API with Zapier" subsection at the bottom of this help section page.
How to get started
- Login to your Zapier account at: https://zapier.com/
- Download the Ongage Zap by directly using this link: https://zapier.com/developer/public-invite/129330/7eeb799a4161327a1da2306d57d9acf0/
- Press on the 'Accept invite & Build a Zap' to get started
Note: Zapier does come with a price tag (see Zapier Pricing), as well as for the usage of premium vendor Zapier Apps (e.g., Facebook, Salesforce, etc.). For large scale volumes, Zapier may become pricey, in which case Ongage customers may want to consider doing Ongage API integration development instead. See also Zapier Plans & Pricing.
![]() Please contact Ongage Support if you need any further assistance regarding zapier integration.
Please contact Ongage Support if you need any further assistance regarding zapier integration.
Example of Salesforce integration with Ongage via Zapier
If you're using Salesforce as your sales-funnel CRM and Ongage for email marketing, then you’ll likely want every new Contact, Lead or Opportunity in Salesforce to get added automatically to your Ongage list, send them a welcome email, and start sending them marketing emails. You can do this with the Ongage-Zapier integration. This very same integration you can use with some ~750 other systems (beyond Salesforce), that Zapier provides integration with!
What you'll need for this setup
You must have an active account in:
- Ongage
- Salesforce
- Zapier
![]() Make sure you have a user that is allowed to connect via API both to Salesforce and Ongage.
Make sure you have a user that is allowed to connect via API both to Salesforce and Ongage.
Step-by-Step Setup Walk-Through
See the following steps for setting up this kind of integration:
- Log into your Zapier account at https://zapier.com/
- Download the Ongage Zap in the “Tap search” or directly using this link –
https://zapier.com/developer/public-invite/129330/7eeb799a4161327a1da2306d57d9acf0/
Press on the ‘Accept Invite & Build a Zap’ to get started.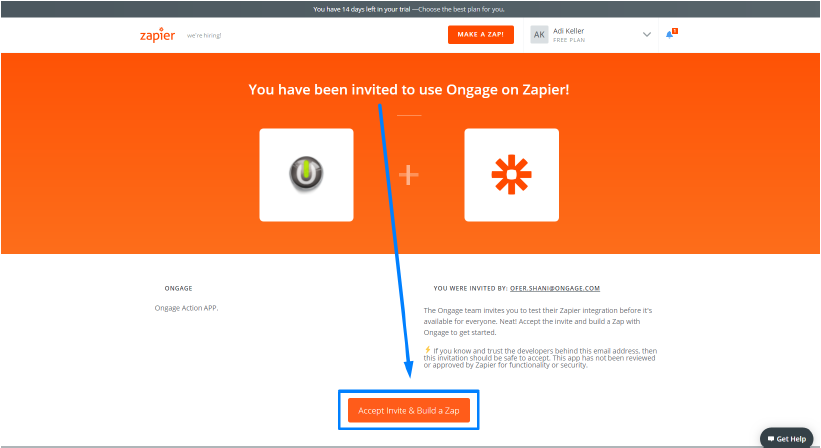
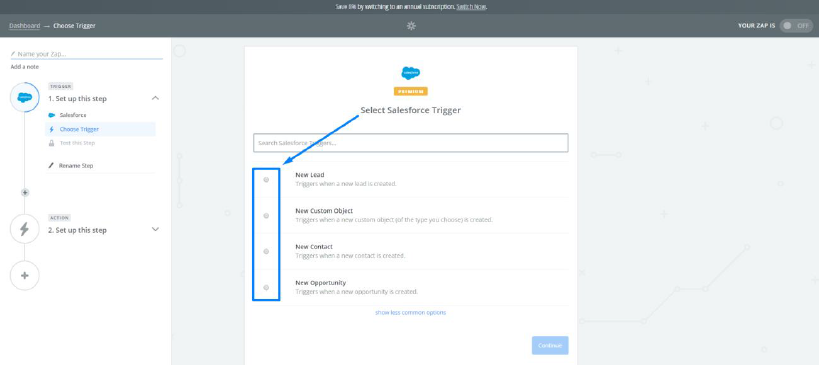
Trigger App: when a chosen action happens in it, it will be the trigger to do something in another app – in our case, when a certain action will happen in SF, it will trigger an action in Ongage. - In the ‘Choose a Trigger App’ search bar, search ‘Salesforce’ and choose it Please note that the Salesforce integration is a premium Zap, which cost ~$20/month.
.png?version=1&modificationDate=1652178152610&cacheVersion=1&api=v2&width=626&height=250)
- In ‘Select Salesforce Trigger’, choose one of the four options presented: New Lead, New Custom Object, New Contact, New Opportunity. Once chosen, press on the ‘Save + Continue’ button.
- In ‘Select Salesforce Account’, there are two options:
- Should it be your first ZAP, click on the ‘Connect an account’ button. A new window will pop up, enter your Salesforce account’s credentials.
- Should this be your 2nd time or more, choose the required account (out of the accounts you previously logged in with).
When connecting to Salesforce, be sure you’re connecting to your Production account or to the relevant Sandbox account.
Once completing this step, press the ‘Save + Continue’ button.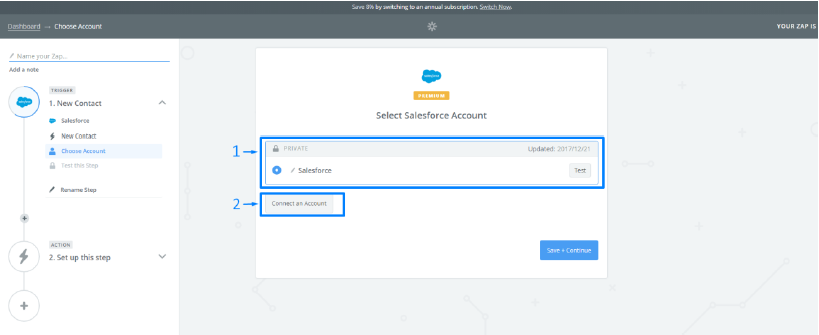
- After completing the previous step, in the next window a notification of ‘Things to double check’ will be displayed, follow this order before pressing the ‘Fetch & Continue’ button.
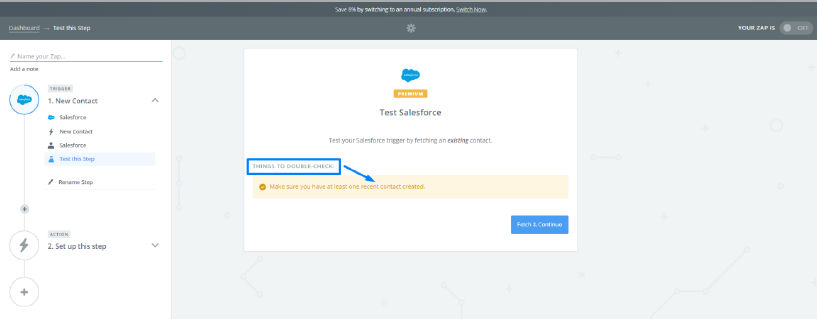
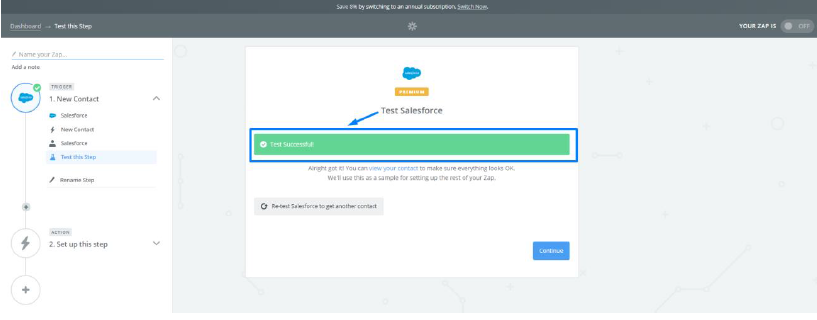
- ‘Test Salesforce’ – once ‘Test is Successful’ notification is displayed, press the ‘Continue’ button.
Action: The app in which an action will happen after the trigger was activated. - In ‘Choose an Action App’ search bar, search for ‘Ongage’ app and choose it.
.png?version=1&modificationDate=1652256031469&cacheVersion=1&api=v2&width=665&height=249)
Note that, should you’ve accepted the Ongage invitation, the Ongage app will be automatically chosen for you.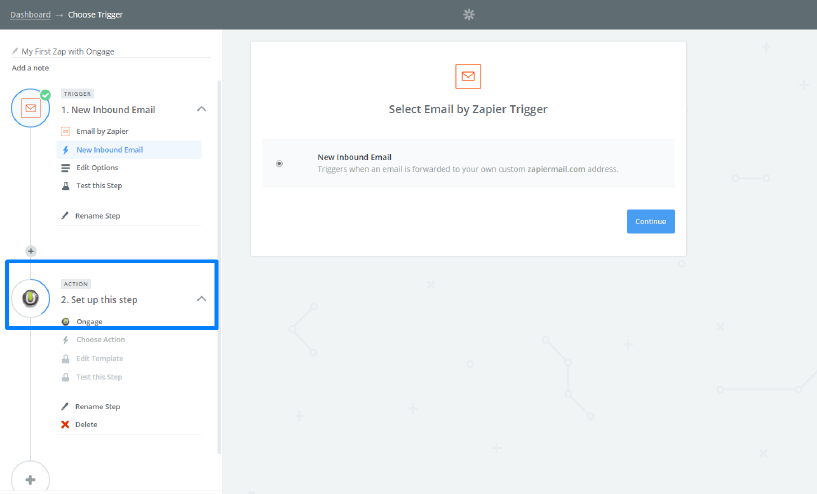
- In ‘Select Ongage Action’, choose one of the four options presented: Suppress Contact, Add/Update Contact, Send Transactional Email, Update Contact Status.
In our case, please select “Add/Update contact” and press on the ‘Save + Continue’ button.
- In ‘Select an Ongage account’ there are two options:
- Should it be your first ZAP, click on the ‘Connect an account’ button. A new window will pop up, enter your Ongage account’s credentials
- Should this be your 2nd time or more, choose the required account (out of the accounts you previously logged in with)
.png?version=1&modificationDate=1652248532974&cacheVersion=1&api=v2&width=448&height=249)
.png?version=1&modificationDate=1652248563289&cacheVersion=1&api=v2&width=448&height=249)
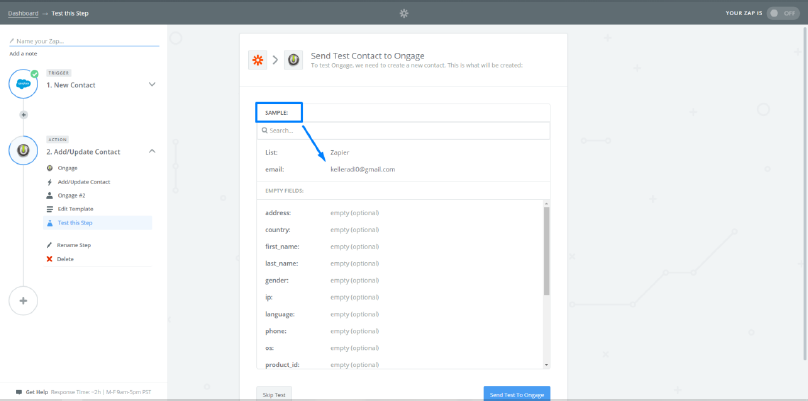
- In ‘Set an Ongage Account’, after choosing an account, need to choose the required list. Once the list is chosen, a list of the list’s fields will be displayed. Please note that the contact will get created in the list you’re selecting. You can use it to have separate lists for Salesforce Contacts and Leads.
Fill in the fields in one of two ways, you can either fill them manually or choose from the dropdown.Note that if a field is obligatory in your original Ongage account, it will be obligatory here as well..png?version=1&modificationDate=1652255741536&cacheVersion=1&api=v2&width=684&height=249)
.png?version=1&modificationDate=1652255766388&cacheVersion=1&api=v2&width=600&height=378)
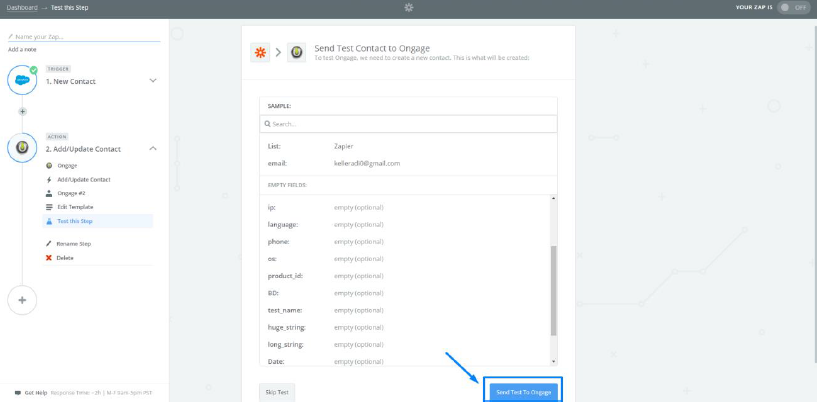
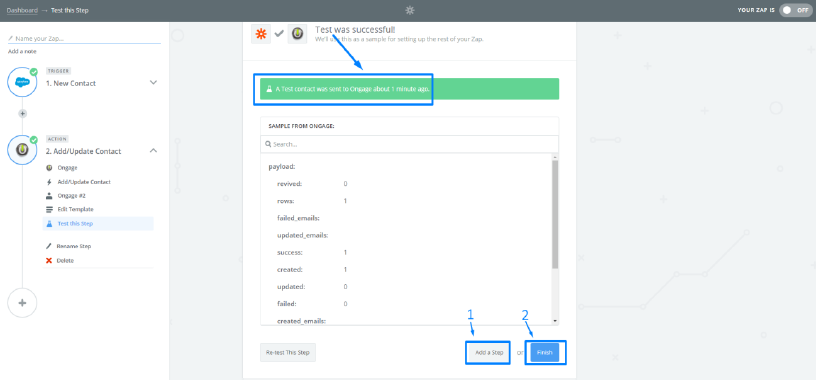
- Next window will display a sample of the added contact, press the ‘Send Test to Ongage’ button.
- Press ‘Send Test to Ongage’.
- Next window will indicate whether the test was successful or not. Here you have 2 options.
- Press the ‘finish’ button, at which point the Zap will be ready.
- Press the ‘Add a Step’ button, at which point you will be able to repeat the ‘Action’ part in order to add an additional action. For example, in addition to add a contact to the account, a transactional email will be sent as well.
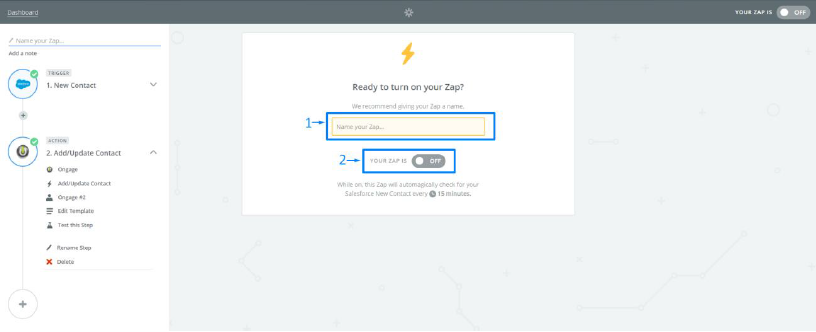
- Once the previous step is done, name the Zap and turn it on (in the case of Salesforce integration, a small fee is required).
Once activated, all you have to do is to create a new Contact/Lead in Salesforce, and see it in Ongage. Please note that Zapier run asynchronously (every 15 minutes or so), so some delay is expected when coming to see the contact on Ongage side.
Example of how to add a contact to Ongage from Google Forms using the Ongage Zap
One of the more common ways to collect a lead from your website, is by using a basic web form. The harder part can be to the get the contact data collected on the form, into your mailing list. Now with Zapier and the Ongage Zap you can easily do that.
Note:
- For the following demonstrated integration you'll need a live Google form that's set up to collect responses into a Google Spreadsheet.
- The Ongage Zap can be used with any contact collection app, this is just one demonstration showing how you'd use it with Google Forms.
How It Works
Get a new response to your Google Form (i.e., a new lead).
The Ongage Zap will then add that contact into the Ongage list of your choice.
What You'll Need
A Google Docs account
An Ongage account
Step-by-Step Setup Walk-Through
See the following steps for setting up this kind of integration:
- From the main Zapier dashboard-click “Make a Zap”.
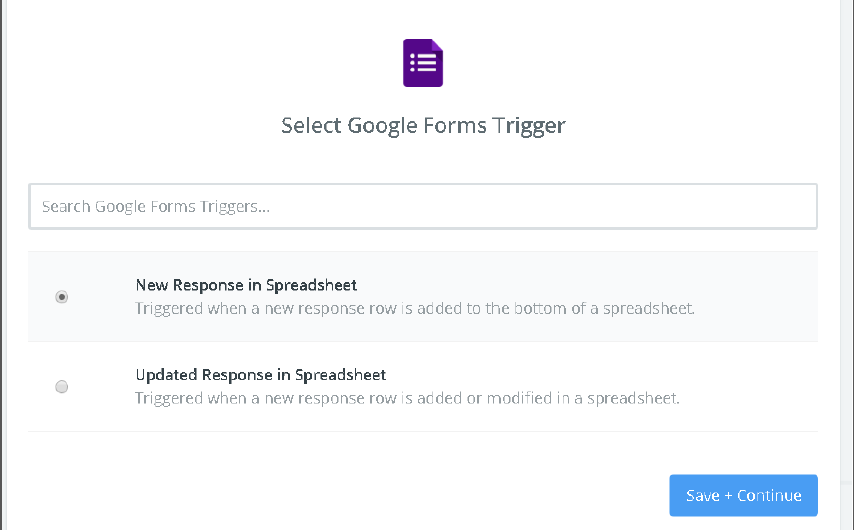
- On the step “Choose App”, look for and click on “Google Forms”.
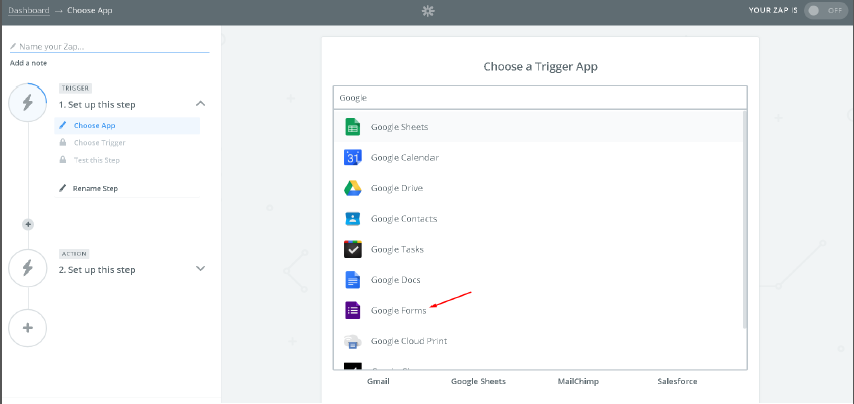
- On “Choose Trigger” step, select one of the two options (as needed) then click “Save + Continue”.
- If you’ve already added a Google account to Zapier, click on “Test” or click on “Connect a New Account”.
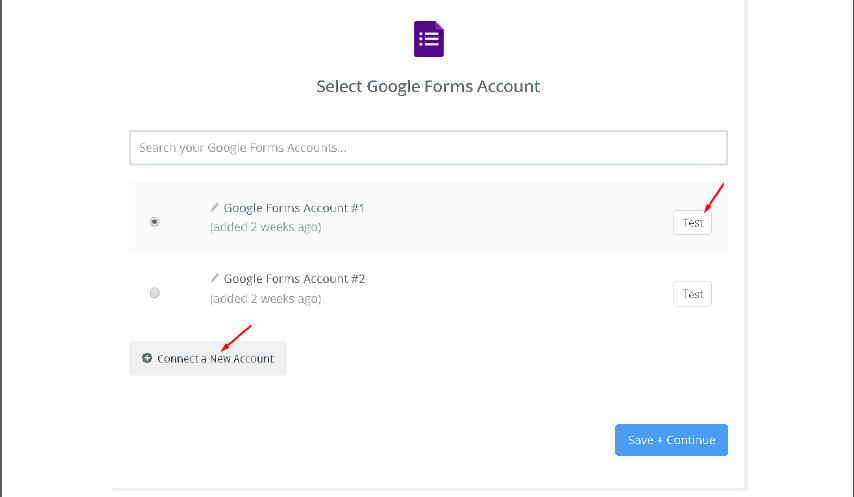
- Click “Save + Continue”.
- After clicking on “Test” Button, a success dialog should appear as following:

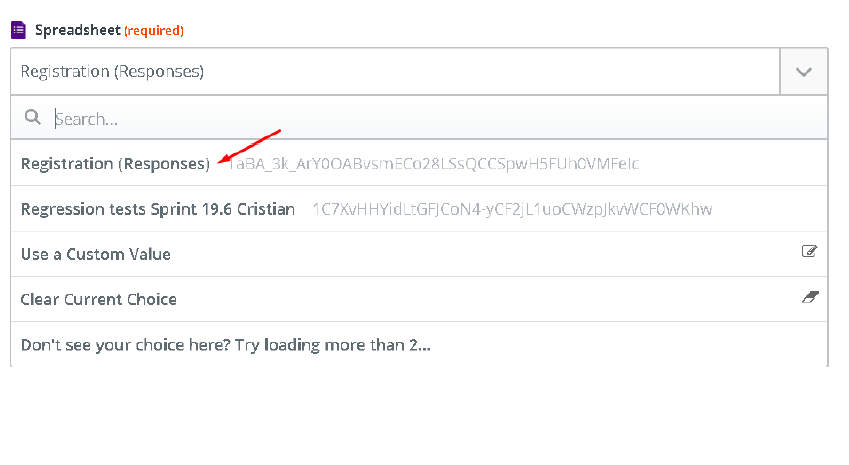
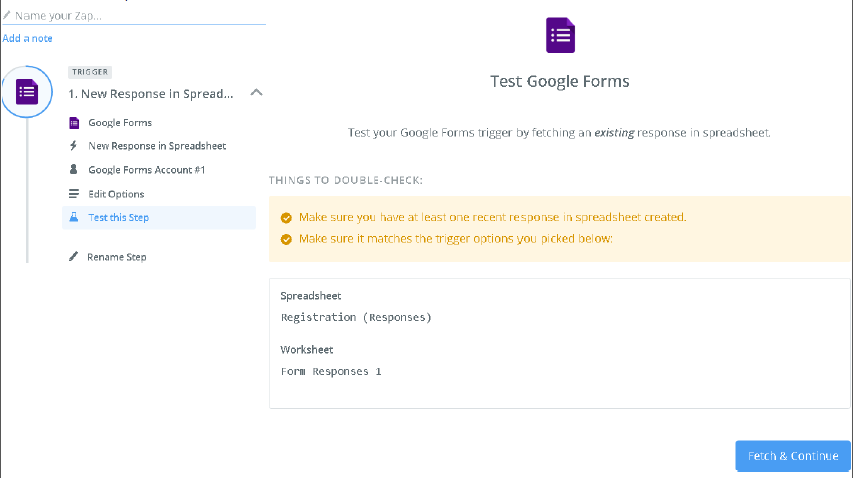
- On “Set Up Options” step, both, Spreadsheet and Worksheet are required.
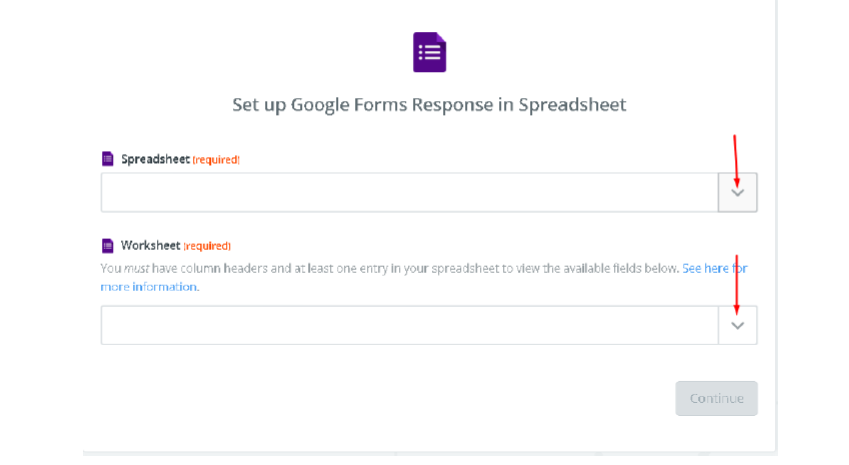
Both Spreadsheet and Worksheet must be documents where Google Form is storing the form responses. - Click on Spreadsheet and Worksheet dropdowns and select the desired form responses.
- On “Test this Step”, Zapier will try to fetch the first Google Form response, if there is no response detected on your spreadsheet, the yellow messages below are shown, you can still continue if you’re sure the previous selected spreadsheet and worksheet are the correctones.
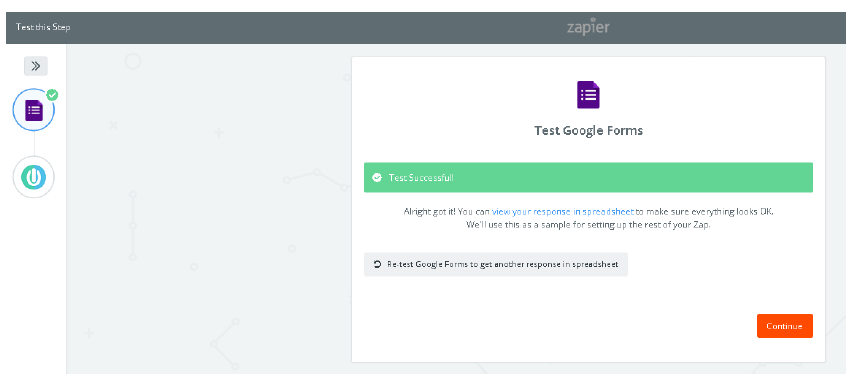
- You should then get “Test successful” click on “Continue“.
- On the “Action” -> “Choose APP”, look for “Ongage”.
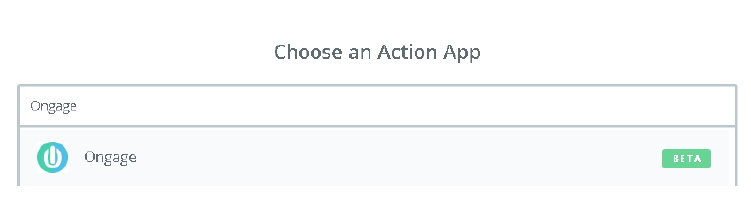
If you don’t see “Ongage”, enter the following link:
https://zapier.com/developer/public-invite/129330/7eeb799a4161327a1da2306d57d9acf0/
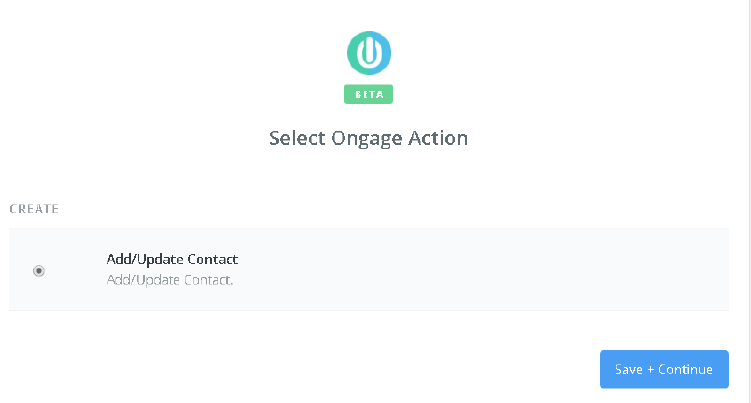
- On the “Choose Action” step, pick the “Create Contact” and click on “Save + Continue”.
- On “Choose Account” step, click on the Ongage account or “Connect a New Account”.

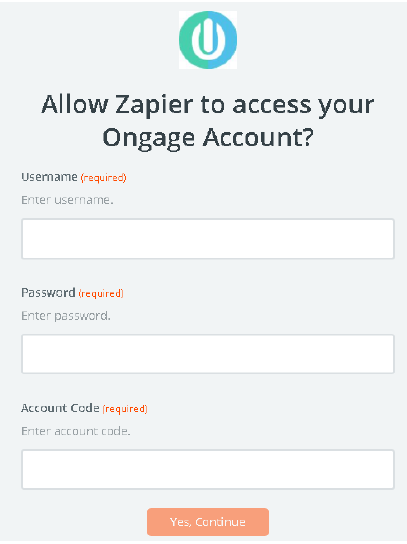
- If you choose the “Connect a New Account”, a new pop-up window will show and will request your “Ongage Credentials” + “Account Code”. See this link for instructions where to find you Ongage Account Code.
- On the “Set Up Template”, select the desired Ongage List and the fields you’d like to map between the Google Form and the Ongage List.
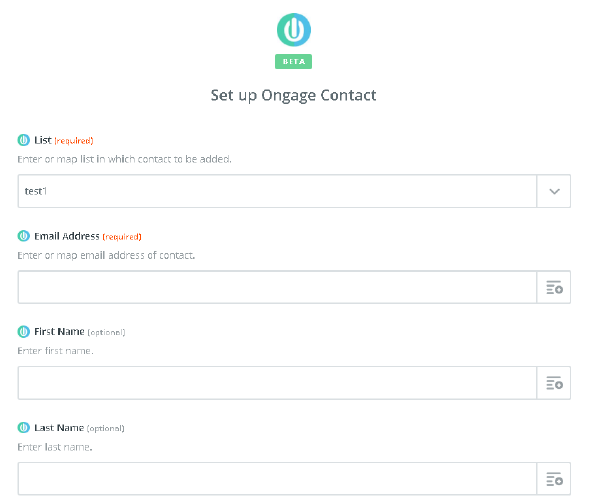
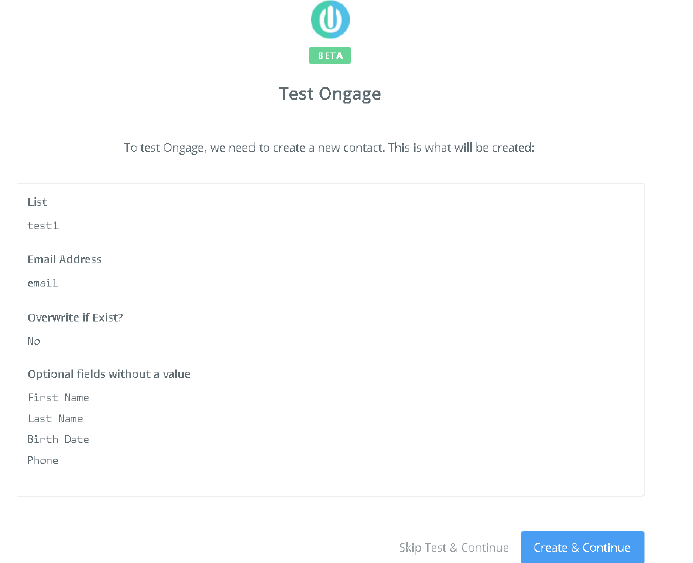
Note: Besides the List field, the fields appearing here are your Ongage field names, and in the dropdowns are the Google form fields. - On the “Test this Step”, Zapier will try to fetch your last contact from your Google Forms and create a new contact in Ongage.
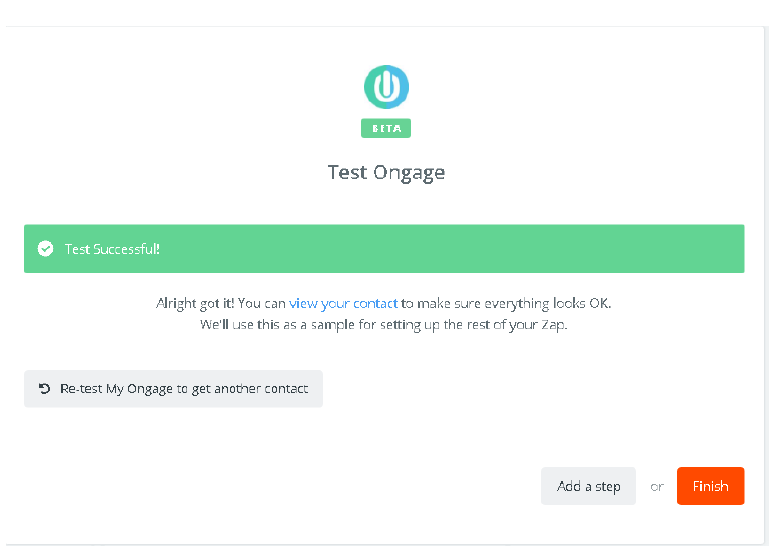
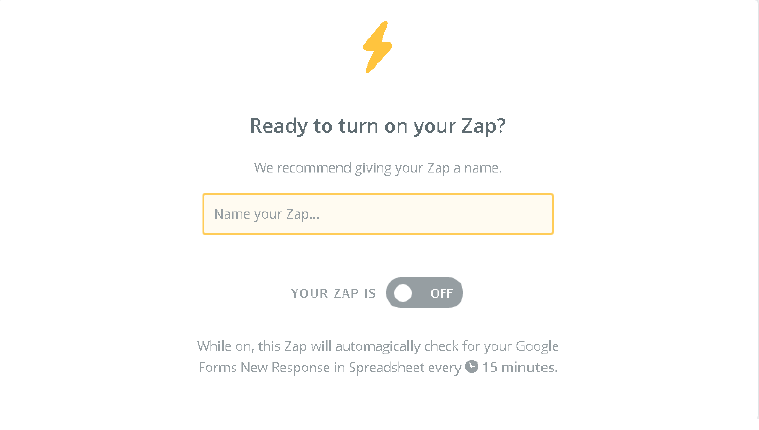
- By continuing the previous step, if the test is successful, you’ll see the below message. Click on “Finish” to save the Zap.
- Name your Zap and switch it on in order to activate it.
Using Ongage API with Zapier
You can use "Webhook" option from Zapier if you want to skip direct integration of Ongage. This API can be used for all four methods mentioned HERE.
Below is one example on how Ongage API can be used to connect both platform.
- Select "Webhook" option at any Zap and in "Setup" stage it will give you option to select the API method that you want to use (POST, PUT, GET etc).

In configure step you will be able to add API endpoint; request body; and Authentication to push/get data at Ongage like below.