/
Ongage Email Preference Center
Ongage Email Preference Center
- Ongage OngageConnect
Owned by Ongage OngageConnect
Last updated: Nov 10, 2021
Table of Contents:
Configurable Email Preference Center
Ongage offers a fully configurable PHP & JavaScript email preference center package (made up of 4 files) that can be easily integrated into your PHP based website without any coding.
- Setup a fully tailorable preference center on your website that communicates directly with your Ongage account enabling your subscribers to update their contact details, mailing preferences, as well as unsubscribe and/or delete themselves from your Ongage list.
- Choose which options, buttons and fields are accessible in the form by simply editing the Config.php and index.html files.
- This preference center addresses GDPR requirements for those that require it.
- Download the following zip: contact_preference_sdk.zip containing the following files:
- Config.php
- index.html
- OngageConnect.php
- server.php
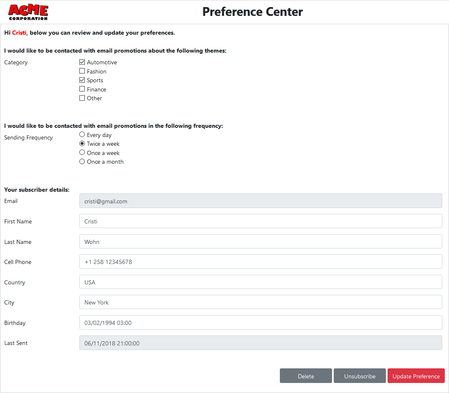
- There's no need for any Ongage API coding, as the code is built-in to these files. All you need is for your webmaster to configure these files into your website, if it is a PHP based website. Here's just one example of how this page can be configured to look like:
Technical Details
Config.php
- By default all list fields in your list will be view-able and edit-able from the form. However if you want to limit which fields are view-able and which are edit-able you have the following 2 arrays:
- visible_list_fields
- editable_list_fields
- When you add one or more list fields to either of those arrays, then only those fields indicated will be view-able and/or edit-able.
index.html
See inside commented section of this file for instructions and examples of how to implement check-boxes and radio buttons in this preference center form
                 /**
				 * Configure checkboxes fields
				 *
				 * Each key of the checkbox object must be real list-field name and it must contain an inner object with the following keys:
				 *
				 * The checkbox object assumes you saved some data in a format similar to this example: "value1,value2,value3" (notice the "," delimiter)
				 *
				 * delimiter - string - the delimiter you used in your contact's list field
				 * options   - object - with the following format: {value1: 'Title 1', value2: 'Title 2'}
				 *
				 * If contact's "checkbox" list-field value is not empty - The checkboxes that contains the contacts values will be checked
				 * In contact's "checkbox" list-field is empty           - Non of the checkboxes will be checked
				 *
				 *
				 * **********************************
				 * * Example of the expected format *
				 * **********************************
				 * (This example will output one form group with two checkboxes)
				 *
				 * checkboxes = {
				 * 	// Field name
				 * 	list_field_name: {
				 * 		// String delimiter
				 * 		delimiter: ',',
				 * 		// Checkbox options {value => label}
				 * 		options: {
				 * 			option_value_1: 'Option title 1',
				 * 			option_value_2: 'Option title 2'
				 * 		}
				 * 	}
				 * }
				 *
				 *
				 *
				 * @type {object}
				 *
				 */
				checkboxes = {},
				/**
				 * Configuring radio buttons
				 *
				 * Each key of the radio buttons object must be real list-field name
				 * The inner object must have the following format:
				 *
				 * {value: 'title'}
				 *
				 * In case user's list-field value is empty - non of the radio button will be marked
				 *
				 * **********************************
				 * * Example of the expected format *
				 * **********************************
				 * (This example will output 1 form group with 2 radio-buttons)
				 *
				 * radio_buttons = {
				 *	// Field name
				 *	list_field_name: {
				 *		// Radio buttons options
				 *		option_value_1: 'Option title 1',
				 *		option_value_2: 'Option title 2',
				 *	}
				 *}
				 *
				 * @type {object}
				 */
				radio_buttons = {};
How to Use This Preference Center as your Primary Unsubscribe Page
If you're using this preference center as your main email unsubscribe page, you'll need to do the following:
- Ask Ongage Support to disable the enforcing of the Ongage unsubscribe link in the body of your email message.
- Instead of using the Ongage unsubscribe link, you'll use a regular link in the body of your email message that will lead to this preference center page for unsubscribing.
- Note: in this case these links will get click counts, unlike Ongage unsubscribe links which don't count clicks. Having said that in the WYSIWYG editor, you can set this link to not count clicks.
- On this link pass the following parameters: {{email}}, {{ocx_list_id}} and {{ocx_child_id}} (in order to associate the unsubscribe to it's corresponding campaign).
- In the server.php file, adjust the code to read the incoming URL parameter: {{ocx_child_id}}.
- In OngageConnect.php file pass {{ocx_child_id}} to the change_status API call.
![]() Alternatively, some customers choose to keep the Ongage unsubscribe link, and send in their emails two links:
Alternatively, some customers choose to keep the Ongage unsubscribe link, and send in their emails two links:
- One link to the preference center with accompanying text about changing one's mailing preferences (e.g., mail topics, frequency, etc.)
- And a second smaller link at the bottom to unsubscribe from all mailings directly from the email.
- In that case, customers will typically also choose the "Add Unsubscribe Confirmation Page" in the Email Settings.
- And they might also choose the "Success Page Redirection" option – to anyway send the contact to the preference center, just in case they may want to resubscribe.
, multiple selections available,
Related content
List Settings
List Settings
More like this
List-Unsubscribe Header
List-Unsubscribe Header
More like this
Account Setup Wizard
Account Setup Wizard
More like this
Configurations
Configurations
More like this