Automation Rules Examples
- Ongage OngageConnect
- Pratik Upadhyay
Table of Contents:
It is recommended to peruse the parent intro section Automation Rules before reviewing the examples below.
Transactional Message Examples
In the parent section Automation Rules you'll find an example of How to send a transactional message after an Open or Click.
As noted there, it is recommended to setup a separate Transactional campaign for each Automation Rule that has a transactional action in order to track the stats (sent, open, clicks, etc) specifically related to that Automation Rule.
How to Send a Transactional Message Based on Any Change in a Given List Field
Use-case: Let's say you have an offering, where your customers can change their package level from your website. At that point you might want to send them a Transactional message confirming the package change. Here's how to implement that with any change in a list field value.
- Rule Settings
- Rule Trigger: assuming this is for existing customers, you'll choose the 'Contact created or edited' option as this will be an edit.
- Rule Frequency: Always – as you want to send this every time a customer changes their package level.
- Trigger Source: Choose API call update from your Website, or from Ongage platform, in the case of manual update by customer service personnel.
- Rule Criteria: choose the field which contains the value, and select either 'Changed To' 'any value' or 'Changed From' 'any value'.

- Rule Action: Choose Transactional
- You'll typically want to check: 'Check Contact Status' (i.e., don't send to inactive: unsubscribed/hard bounced/complained) and 'Check Suppression' (i.e., check against relevant suppression lists).
How to Setup a Drip Welcome Series
![]() Note: Another (and somewhat more versatile) way to set such a welcome drip campaign is using our Events & Triggers (see there: 'How to Setup a Welcome Onboarding Series').
Note: Another (and somewhat more versatile) way to set such a welcome drip campaign is using our Events & Triggers (see there: 'How to Setup a Welcome Onboarding Series').
This example will send 3 emails after a contact has been created at an interval of 5 mins, 1 day and 2 days after Created Date (aka sign-up date).
- Rule Settings
- Rule Trigger: select: Contact create.
- Rule Frequency: select: Once.
- Trigger Source: Currently the API call and Ongage Platform (manual add) option is available for this scenario.
- Rule Criteria: No rule criteria needs to be selected here for setting up Drip welcome series for every contact being added into the list.
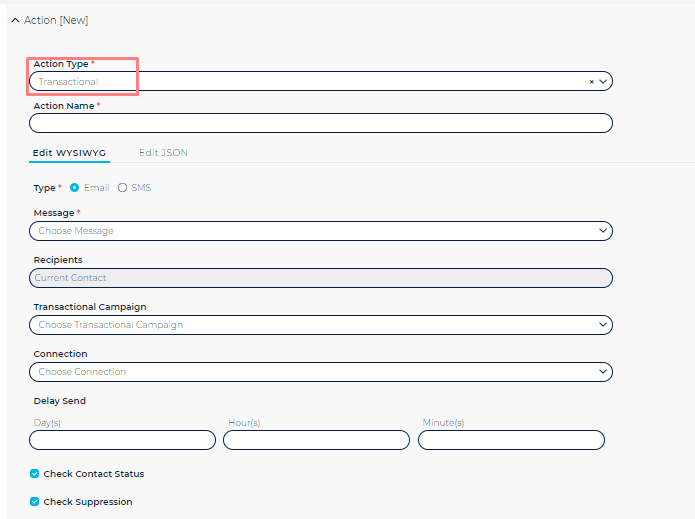
- Rule Action: Create 3 Transactional Actions and select Delay Send as demonstrated below:
- Transactional Action 1 with 5 minutes Delay.
- Transactional Action 2 with 24 hours Delay.
- Transactional Action 3 with 48 hours Delay.
How to Setup a Confirmation Unsubscribe SMS Text Message
In order to send confirmation unsubscribe SMS Text Message, please follow the steps given below.
- Rule Settings
- Rule Trigger: select: Contact Unsubscribed
- Rule Frequency: select: Always
- Rule Criteria: In ESP Select: Sinch or twilio- as this feature currently only works for those SMS vendors.
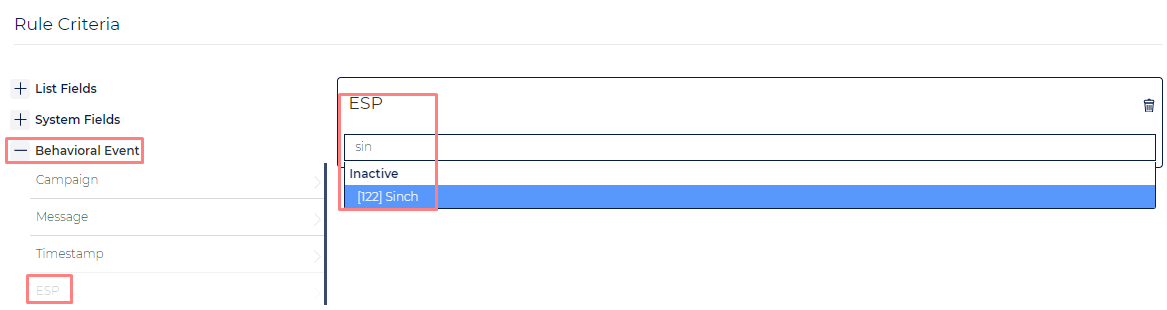
- Rule Action: Set up Transactional Action with an SMS type message, which will send a confirmation SMS to those contacts who unsubscribed.
How to Send a Welcome Message via a Different Vendor Connection
Ongage has a built-in welcome message as detailed in List Settings. That setting only allows for sending a welcome message via one SMTP/SMS vendor connection. If you'd like to send your welcome messages for a given segment via a different vendor connection, here's how you can do that.
- Rule Settings
- Rule Trigger: select: Contact create.
- Rule Frequency: select: Once.
- Trigger Source: Currently the API call and Ongage Platform (manual add) option is available for this scenario.
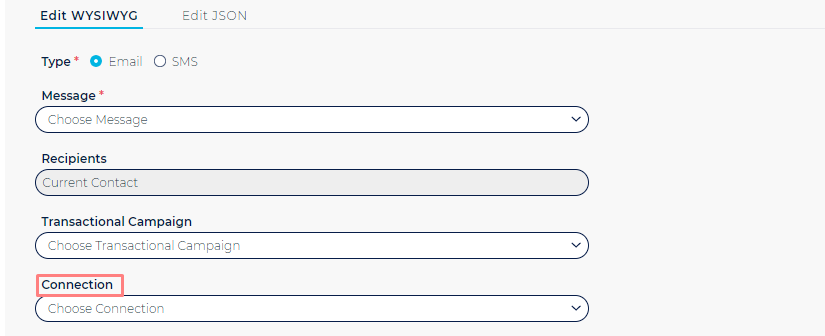
- Rule Criteria: choose a criteria for those that you want to send via a specific vendor connection, let's say 'gmail.com'.

- Rule Action: choose Transactional and select the desired connection
Notes:
- You can use this method to implement your welcome messages instead of the built-in one in Ongage which only allows sending via one vendor.
- You can use this in conjunction with the built-in welcome message function, if you're using there the segmented welcome, make sure not to double target the segment you're also setting up here.
How to warm-up a new vendor connection with engaged contacts only
To openers (or clickers) in one connection, send a follow-up transactional message via a second connection
![]() This setup can be used for warming up a new IP and/or Sending Domain.
This setup can be used for warming up a new IP and/or Sending Domain.
The basic idea here is, that to all those who opened or clicked (i.e., engaged) on one connection (e.g., the original welcome or event/campaign connection), send them a follow-up message via a new connection. Thus the new connection will only get recently engaged contacts – which is ideal for warm-ups!
You can set that follow-up message to be sent immediately, or after x minutes, x hours, or even a day later, the choice is yours! Some marketers like to do it immediately while the recipient is already in their mailbox, others prefer to send it later on in the day, or the following day, as not to overload contacts with messages.
Automation Rule configuration to send a follow up message via a separate connection
- Rule Settings
- Rule Trigger: select: Contact opened a message.
- Rule Frequency: select: Once per campaign.

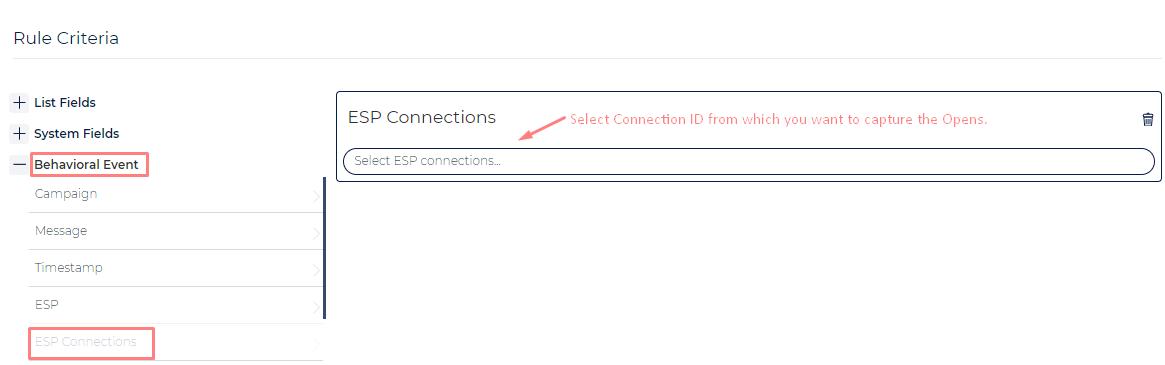
- Rule Criteria
- Go to Behaviour Event.
- Select ESP Connection.
- Select Connection ID from which you want to capture the Opens.
- Rule Action
- Choose Transactional.
Select Email Message.
- Select Transactional Campaign ID.
- Select ESP Connection ID: This will be a separate connection which you want to warm up OR improve engagement for.
- Add Delay (Optional).
How to Send a Cross-Sell Transactional Message Using Email Tags
Let's say you have a list for Insurance. You can tag your email messages with your various insurance sub-verticals such as: car-insurance, house-insurance, renters-insurance, life-insurance, etc.
With this kind of setup, you can then easily setup an automated cross-sell message using a transactional AR. For example, if someone clicked a message tagged with car-insurance, you can then send them an offer for house-insurance.
In order to achieve this you first need to add Email Tags in the relevant Email Messages. Then, setup one Automation Rule per cross-sell, and follow the steps below.
- Rule settings
- Rule Trigger: Select Contact clicked on a link.
- Rule Frequency: Choose Once or Once per Campaign (depending on your use-case), this will ensure that a contact will receive only one transactional message, even if they clicked in the same email message more than once in the same campaign.
- Rule Criteria
- Select Email Tag you want to send a cross-sale to

- Select Email Tag you want to send a cross-sale to
- Rule Action: Choose Transactional and select the desired cross-sale message, transactional campaign and connection.
How to Add a Behavioral Criteria to an Automation Rule Based on Contact Create/Edit
Use Case:
- When using the 'Contact created or edited' trigger (i.e., when a list field value has been updated), you'll notice that there are no available behavioral criteria e.g., Open, Click.
- But, if you'd like to send a Transactional Email based on a List field update, and only target contacts who opened (or clicked) in the last X days – you can achieve that by setting up two Automation Rules, in the following manner:
- One behavioral AR, to collect the last Open (or click) into a new designated date list field, let's call it: last_opened.
- And the second edit AR, using that last_opened field as a criterion.
![]() First you will need to create a new Date type List Field under List → List Settings → Fields Setup, e.g., last_opened.
First you will need to create a new Date type List Field under List → List Settings → Fields Setup, e.g., last_opened.
Automation Rule 1: Update field with the latest open
- Rule Settings
- Rule Trigger: select: Contact opened a message.
- Rule Frequency: select: Once per campaign
- Rule Criteria
- Leave it Empty.
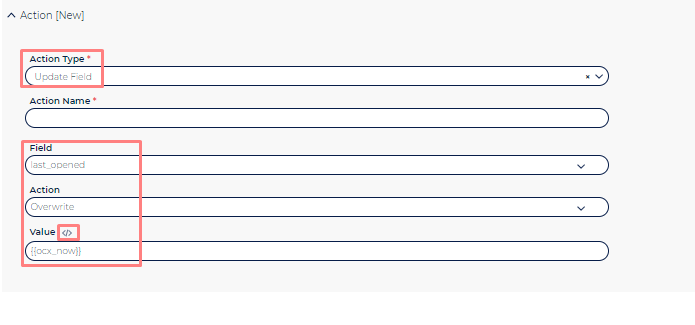
- Rule Action
Choose Update Field.
- Select the designated date type list field to be populated.
- Select update field option: Overwrite.
- Use System field {{ocx_now}} which can be found in the list of available system fields in the accompanying icon.
With the above configuration, this Automation Rule will populate last opened date, for every contacts that opens.
Automation Rule 2: Send transactional based on edit and latest opened
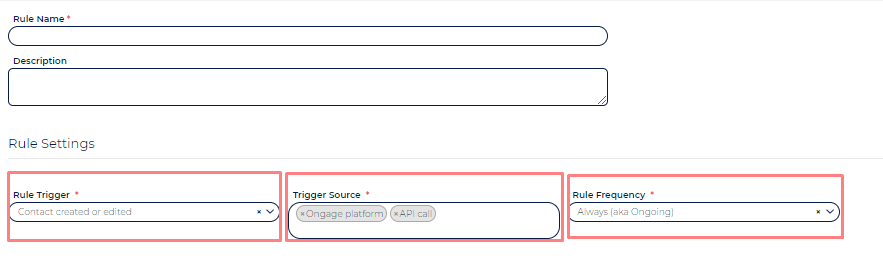
- Rule Settings
- Rule Trigger: select: Contact Created or Edited.
- Trigger Source: select: Ongage Platform and API.
- Rule Frequency: select: Always.
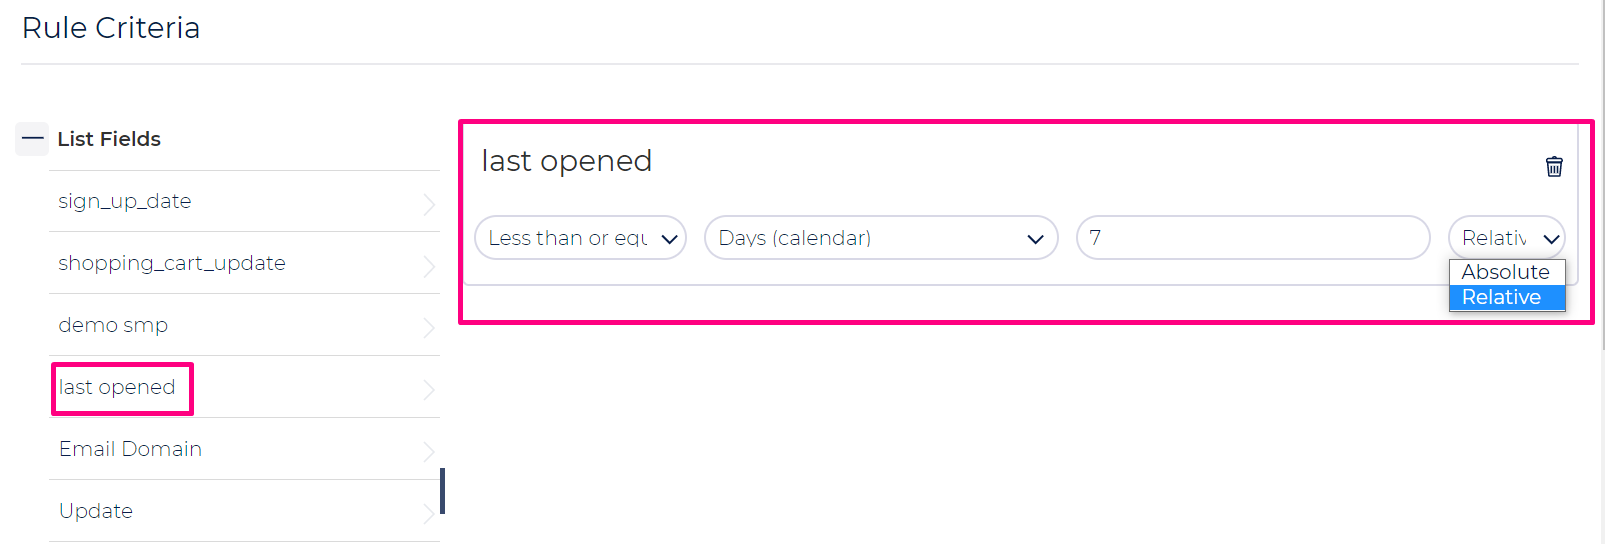
- Rule Criteria
- Select the List Field which will be edited as per your use case and configure the criteria to filter the relevant contacts e.g., Service Package, Game Level, etc.
- Then add an additional criteria, select the Date Field which you have used in Automation Rule 1, and Select the time range you want to apply for this behavioral criteria. E.g., if you want to send to Openers in Last 7 days, then you can select Relative Less than or equal 7 Days in the criteria.
- Rule Actions
- Select action type as Transactional.
- Select Email Message ID.
- Select Transactional Campaign ID from which you want to send Campaign.
- Select ESP Connection ID.
- Add delay (optional).
Update Field Examples
Update a list field with the IP of the last click
By capturing the IP and storing it in a list field, you can then use the Ongage feature 'Send by Timezone'. For details about that feature see the Campaigns help page.
- Rule settings
- Rule Trigger: select: Contact clicked.
- Rule Frequency: select: Once per campaign.
- Rule Criteria
- None / Empty
- None / Empty
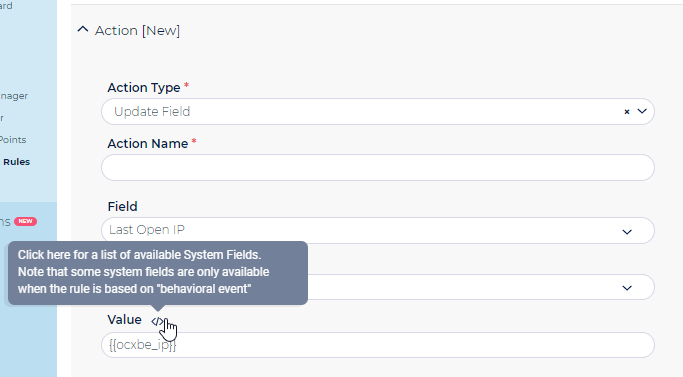
- Rule Action:
- Choose Update Field.
- Select the list field to be populated.
- Select update field option: Overwrite.
- Use System field {{ocxbe_ip}} which can be found in the list of available fields in accompanying icon.
![]() Note: Due to Apple MPP and Gmail image proxy, it is recommended to capture the IP based on click rather than open.
Note: Due to Apple MPP and Gmail image proxy, it is recommended to capture the IP based on click rather than open.
How to update the status of a contact
You can change the status of contact using this Update Field action in the following manner:
- Rule settings
- Rule Trigger: select: Contact added or edited.
- Rule Frequency: Depends on use-case
- Rule Criteria
- Depends on use-case
- Depends on use-case
- Rule Action:
- Choose Update Field.
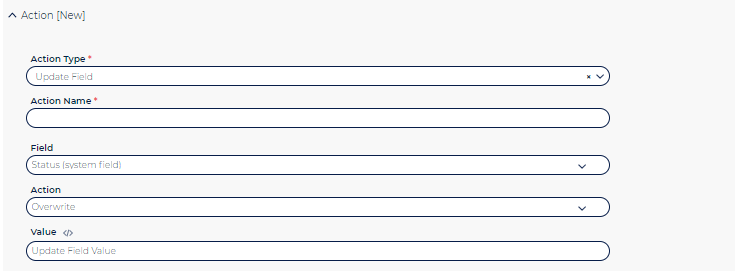
- Select 'Status (system field)'.
- Select update field option: Overwrite
- Use one of the following 'Update Field Values': active, unsubscribe, hard_bounce and complaint (not case sensitive).
Webhook Examples
How to Send All Open Data Back to Your CRM
- Rule settings
- Rule Trigger: select: Contact opened a message.
- Rule Frequency: select: Always (aka Ongoing).
- Rule Criteria
- None / Empty
- Rule Action: choose Webhook
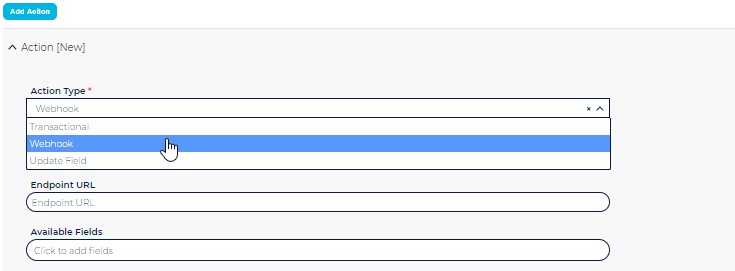
- Enter Action Name
- Enter Endpoint URL
- Select the data points (List Fields, System Fields, and Behavioral Event data) associated with the open, that you'd like to send to your CRM.
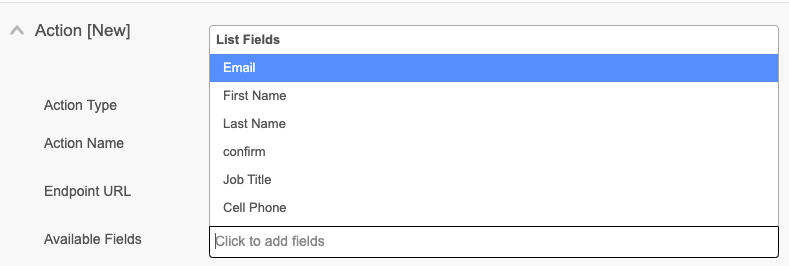
 For example you might want to send the: Email, the system Create Date of the contact, the Campaign ID of the open, the Message ID of the open, and the Timestamp of the open.
How to Send Click/Hard Bounce/Soft Bounce/Unsubscribe/Complaint via Webhook
![]() Similarly you can send click, hard bounce, soft bounce, unsubscribe and complaint data via the webhook as well back to your CRM by choosing the appropriate trigger. Note: regarding bounces, unsubscribes and complaints you can also use the Ongage Account Level Webhook, but in that case, you don't have there the same amount of flexibility as to what accompanying data to send over.
Similarly you can send click, hard bounce, soft bounce, unsubscribe and complaint data via the webhook as well back to your CRM by choosing the appropriate trigger. Note: regarding bounces, unsubscribes and complaints you can also use the Ongage Account Level Webhook, but in that case, you don't have there the same amount of flexibility as to what accompanying data to send over.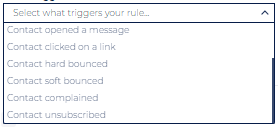
Appendix
Webhook Post Examples
Sample Open Webhook JSON
{
   "account_id":1234567,
   "list_id":12345,
   "automation_rule_id":104591,
   "events":[
      {
         "email":"some.email@gmail.com",
         "ocx_bounce_date":null,
         "ocx_status":0,
         "ocxbe_type":"open",
         "ocxbe_email_message_id":"153861",
         "ocxbe_timestamp":"2021-08-05 06:40:15.645",
         "ocxbe_esp_id":19,
         "ocxbe_connection_id":12345,
         "ocxbe_link_id":0,
         "ocxbe_ip":"74.125.209.63",
         "ocxbe_country_code":"US",
         "ocxbe_browser":"Google Mail",
         "ocxbe_os":"unknown",
         "ocxbe_trigger_id":null,
         "ocxbe_segment_id":1234567,
         "ocxar_event_timestamp":"2021-08-05 06:41:04.633",
         "ocxar_trigger_source":"recipient_action",
         "ocxar_trigger":"opened"
      }
   ]
}
Sample Unsubscribe Webhook JSON
{
   "account_id":1234,
   "list_id":123456,
   "automation_rule_id":123456,
   "events":[
      {
         "email":"some.email@gmail.com",
         "ocx_bounce_date":null,
         "ocx_status":0,
         "ocx_resubscribe_date":1617199031,
         "ocx_unsubscribe_date":null,
         "ocx_contact_id":"5fa10cdb620efff8308b4567",
         "ocx_created_date":1604390107.8723,
         "ocx_import_id":1329760414,
         "ocxbe_type":"unsubscribe",
         "ocxbe_mailing_id":1234567890,
         "ocxbe_email_message_id":"9650280",
         "ocxbe_timestamp":"2021-08-10 05:57:42.228",
         "ocxbe_esp_id":58,
         "ocxbe_connection_id":12345,
         "ocxar_event_timestamp":"2021-08-10 05:58:17.934",
         "ocxar_trigger_source":"recipient_action",
         "ocxar_trigger":"unsubscribed"
      }
   ]
}
Automation Rule System Fields
Following is a new set of system fields, created for use in Automation Rules, which all start with the prefix ocxbe_(where 'be' stands for behavioral event).
Typically you can use these for updating a list field value, when using the 'Update Field' Action option, or when sending Webhook.
| Name | Title |
| ocxbe_type | Behavioral Type |
| ocxbe_mailing_id | Campaign ID |
| ocxbe_email_message_id | Email Message ID |
| ocxbe_timestamp | Timestamp |
| ocxbe_esp_id | ESP ID |
| ocxbe_connection_id | ESP Connection ID |
| ocxbe_link_id | Link ID |
| ocxbe_ip | IP |
| ocxbe_country_code | Country Code |
| ocxbe_browser | Browser |
| ocxbe_os | OS |
| ocxbe_trigger_id | Trigger ID |
| ocxbe_segment_id | Segment ID |
| ocx_now | Date/Time of action |