Table of Contents:

Subsection Pages

Fields Setup
List Overview
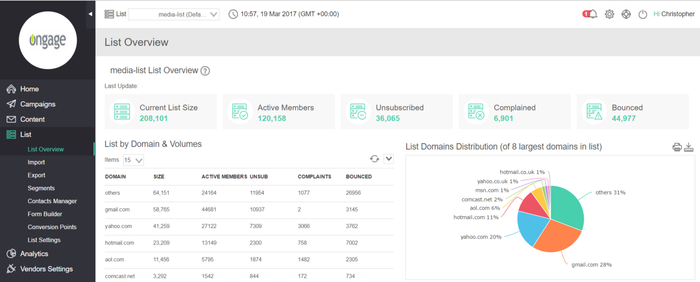
The List → List Overview: provides you with an overview of your Ongage List (aka contacts DB) as to overall size, number of active contacts (aka members, subscribers), unsubscribed, etc.
About Domains Distribution aka Top Domains in List
- The List Domain Distribution (aka top domains or top level domains) pie chart shows which are the top ISP/Mailbox provider domains (e.g., gmail.com, yahoo.com, etc.) that reside in your List.
- That distribution is unrelated to sending, and only reflects which top domains reside in each of your lists.
- This pie will show the top 8 domains in your list plus all Others.
- The breakdown can be different from list to list (and in the case of companies doing B2B marketing, the top level domains might be something like Microsoft.com, IBM.com, etc.).
- The List overview data is updated and refreshed once a day.
Import Contacts
How to import contacts and their accompanying data-points into a list
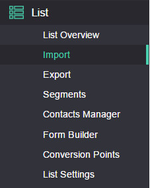
- Go To List → Import
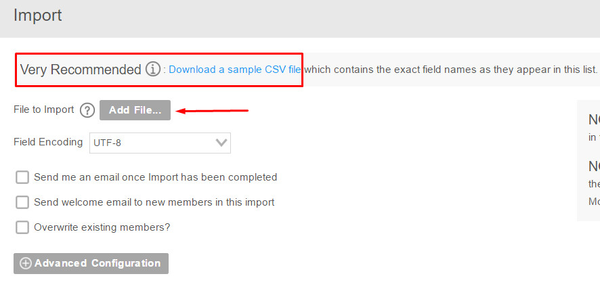
- Click the 'Add File' button to browse to the CSV file you want to import. We strongly recommend that you download a sample CSV file for your convenience as well as to prevent errors when importing into the list.
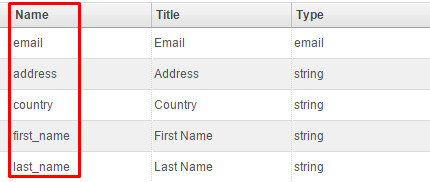
- The column headers of the CSV file you're using to import, MUST match the field names as they are in your List > Fields Setup:
What to watch out for when importing
 The import file must contain at least one column containing the email addresses.
 The column headers of the file that you import MUST match the names of the fields exactly as they are in your List in Ongage.
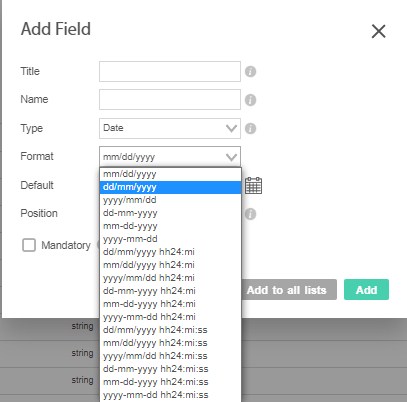
 When uploading date fields, make sure the date format (e.g., dd-mm-yyyy) you're importing matches exactly the format you set for that field, in the field setup (List > Fields Setup). Also note if you try to upload a date and time-stamp to a field that only was set to accept a date without a time-stamp – you might have trouble with the date field getting properly populated.
How long do imports take
- There is no definite answer to the question, as it depends on a variety of factors, from your internet connection, to the amount of data and fields that are being updated for each contact . Having said that, benchmark times for importing emails addresses alone is around 470K contacts / per hour. With a good internet connection, and an import done outside of peak hours, one can experience speeds, twice as fast as that, i.e., nearly 1M per hour.
- You may track the progress of the file upload from within the List→Import screen. When the Status changes to 'Completed' indicates that the import of the entire file has completed.
Parallel imports to increase import speeds
- You can take advantage of of Ongage's parallel processing and decrease import times dramatically by splitting large files (starting from 250K-500K records and up) into smaller files and importing them in parallel. Here are some average benchmark results for parallel imports (times may fluctuate):
- 1 import file ~ 470K per hour.
- 2 import files in parallel can import ~ 940K per hour.
- 3 import files in parallel can import ~ 1.4M per hour.
- 5 import files in parallel can import ~ 2M per hour.
- 10 import files in parallel can import ~ 4M per hour.
- 20 import files in parallel can import ~ 8M per hour.
What is the Max Size of an Import File
- The current default max size of an import file is 500 MB. Depending on how much data might be in each column row, the max number of rows will vary. That max size can be increased to 1GB depending on the pack size and in coordination with your account manager.
How to use the "download CSV sample file"
- To eliminate errors, it is highly recommended that you first download the CSV sample file. You may find the link to that file from within the 'Import Data' interface. The sample file will include all the Dynamic Fields you have defined to this point as headers. Make sure to update the file with your content, while matching the actual content to the file headers
What are the different types of import failures: duplicate, existing, incomplete, invalid
In general: Total = Success + Failed.
- Duplicate – duplicate email addresses within the import file itself.
- Existing – some or all of the emails you're attempting to import already exist in this List.
- Incomplete – mandatory lists fields are missing in the header of the CSV file you tried to import.
- Invalid - email address is not valid (syntax).
If you hover with your mouse over the question mark of each failed type column you'll get the meaning for that fail type.

How do I update existing contacts in a List
If you'd like to update the value(s) of a 1 or more fields for a given set of existing list members, do the following steps:
- Import a CSV file of the members you'd like to update, and check the 'Overwrite existing members' option (see following section for detailed explanation about overwrite).

If for example your list contains 10 fields, but you only want to update the values of one of those fields, let's say for example 'city'. Simply create a CSV file with 2 columns, one with email in column 1 and the other with 'city' in column 2, as in the following illustration:
| email | city |
|---|
| whatever@something.com | New Orleans |
| whomever@somethingelse.com | Tampa Bay |
Overwrite existing contacts aka update existing contacts
Typically "Overwrite existing contacts" is used to update field values for existing contacts in the list. It will also add new members to the list, for all contacts in the CVS that don't yet exist in the list. |
- When you import a CSV file, Ongage compares the email in that CSV file, with the emails in that list. When you check the Overwrite, then data fields in the CSV will be used to update the same fields for each contact in the list.
- When the check-box is not checked, the the data fields of all existing contacts will not get updated and only new contacts will get inserted into the list
 Note: Updating the field values of a contact, does not change their Active/Inactive (bounced, unsubscribed, complaint) status!
Do not overwrite with null values - what does it mean
- When this option is selected, which is the default, and if there are null/empty values in the CSV you are importing, then those null/empty values from the file will not overwrite any existing data in your list, and thus will not null out existing data
Import ID
Intro
 Every contact that you bulk import using a CVS file (or via the API import command) has an Import ID associated with it. You can then use this ID for segmenting all the contacts in that import. See the following section for more details.

New Accounts
 As of 2019 all new accounts have the following System field Import ID in their Segment criterion:

- This system field holds the last 10 import IDs for each contact. What that means is for each contact that you import over and again (e.g., in order to update it list field values), it will retain the last 10 import IDs, that you can segment on. I.e., on the 11th import, the oldest Import ID will get dropped.
- Older accounts, prior to 2019 have also been migrated to this new Import ID, in cases where there were no segments found to be using the older 'Last Import Id'. Moreover, over time, support has suggested older accounts to migrated to this new Import ID.
Old Accounts
For accounts pre-dating 2019 they might have the following System field Last Import ID in their Segment criterion:

In this case only the last Import ID is retained for every contact that was successfully imported. Meaning you can make a segment based ONLY on latest import for a given contact.
 To be noted: many accounts pre-dating 2019 were also converted to the new method that retains the last 10 import IDs, if it was found that the account had no segments using the Last Import ID. If you'd like your account to be switched to the new method, please contact Ongage Support.
How do I update a single contact
Choose any one of the following 3 options:
- Go to List → Contact Manager, enter an email address, and click the 'Search' button, and it will open the Edit Contact Pop-up for that email address.

- Import a CSV file with the contact you'd like to update, and check the 'Overwrite existing contacts' option
- Go to List → Contact Manager. Under the Search Tab,
- Perform a search (of a desired segment or campaign for example).
- Once the report is ready, in the 'View Report', will appear a row for each contact that came back in that search.
- Under the 'Actions' column is an 'Edit 'Contact' icon, click on it to get to the to the Edit Contact Pop-up for that email address.
Import what is the "Set Default Values" checkbox used for
- The 'Set Default Values' button is used to set a default value for a given field when doing an import. When you click the checkbox, a list with all of your dynamic List fields will appear. Check the field(s) you would like to assign a default value for and enter the default value(s). When you import the CSV file, the platform will use the default value you defined here wherever there is no value in the file for that field.

How To: Delete, Unsubscribe, Resubscribe and Re-Activate Contacts in your List
Delete or change contact status to: unsubscribe, hard bounced, complained or resubscribe (aka reactivate)
 Note: Ongage will automatically unsubscribe all contacts that clicked on an unsubscribe link sent in an email from Ongage, so there is not need to do this manually! Similarly regarding hard bounces and complaints, those too are handled automatically by Ongage! These options are provided here, if you're collecting this information on your CRM, 3rd party, and/or other external sources outside of your email marketing operations in Ongage. In addition, you can also reactivate contacts from this page (but note warnings below regarding that).
In the List Menu:
- Go to: List > Contacts Manager and to to the Change/Delete tab/
- There you can either enter the email addresses (aka contacts), directly into the input box, or upload a CSV file, with all the emails you want to update, which is preferred if you're dealing with a larger number of emails (i.e., more than 100).
- Choose the desired drop-down action:
- Mark as unsubscribed: will mark all contacts you upload here as "unsubscribed". These contacts will become inactive and the platform will automatically stop sending to them.
- Mark as hard-bounced: will set the status of all contacts you upload here to hard-bounced. These contacts will become inactive and the platform will automatically stop sending to them.
- Mark as complained: will set the status of all contacts you upload here to complained. These contacts will become inactive and the platform will automatically stop sending to them.
- Remove permanently: will completely and permanently remove contacts from this list.
- Resubscribe (AKA reactivate): will resubscribe/reactivate contacts that are unsubscribed ,as well as reactivate contacts that are hard-bounced and/or complained.
 Note regarding reactivating hard-bounced: This will not not reactivate any hard bounces that also is registered on the outbound ESP or SMTP vendor itself!
Most ESP/SMTP vendors keep their own list of hard-bounces, but some SMTPs like Amazon SES and On-Premise don't. Note about reactivating unsubscribes: If you're using Ongage with either a cloud SMTP vendor or on-premise SMTP, you can easily resubscribe unsubscribed contacts, as this information resides typically only in Ongage.
On the other-hand if you're using Ongage with an ESP that enforces its own unsubscribe link, in that case the unsubscribe info also resides on the ESP, and you will need to resubscribe it there as well!

It is recommended not to remove unsubscribed, hard bounced and complaints from your list. If you do so, you will lose their history and worse, they may get added to your list again and be active!! If they are on your list with an inactive status then adding /updating (via import or API), does not change their inactive status! But if you remove them and their history along with their status, then when you import/add them again, they will be active!! |
Update on Click
This feature supersedes the Post-Back Links feature in the following section |
Intro
- Update a list field, when a recipient clicks on a newsletter link.
- This feature enables marketers to capture data from link(s) that a recipients clicked on in newsletter and update a designated list field with a value associated with that link.
Double Opt-in Example: Overwrite Field with Value in Link
- Let's say you'd like your recipients to confirm that they want to get your newsletters.
- And let's say the List field name you want to capture the confirmation is named: 'confirm'.
- Your confirmation email will contain a link as illustrated below. where the 'ocxf_ prefix indicates that the field 'confirm' will get populated with the value 'Yes' when clicked on:
<a href="https://www.mywebsite.com?ocxf_confirm=Yes">Click here to confirm</a> |
- Then you can either: Segment all those where confirm equals 'Yes' or automatically exclude everyone where confirm is not equal to Yes.
- Note: you can send an additional confirmation email after a contact double-opts in, by using our Automation Rules feature, see there 'Update Field Examples' in the Automation Rules Examples online help page.
Travel Example: Append Values
- In this example you can capture clicks on multiple links.
- Let's say you're running a travel newsletter with several destinations, NY, FL, CA, WA.
- And let's say the destination list field name is: 'dest' and is of type string.
- Use 'ocxfa_<fieldname>' prefix to indicate that you want to append the value rather than replace the value as is the case when the prefix 'oxcf_<fieldname>' is used.
- So if a subscriber clicks on both the 'New York' and 'California' links, then his list field 'dest' will contain the value: "NY;CA;".
<a href="https://www.my-travel.com?ocxfa_dest=NY;">Visit New York</a>
<a href="https://www.my-travel.com?ocxfa_dest=FL;">Visit Florida</a>
<a href="https://www.my-travel.com?ocxfa_dest=CA;">Visit California</a>
<a href="https://www.my-travel.com?ocxfa_dest=WA;">Visit Washington</a> |
All Field Prefix Options Detailed
- ocxf_<fieldname>: overwrite fieldname value with value in link.
- ocxfa_<fieldname>: in case of field type string: append value from link to existing value in fieldname.
- ocxfa_<fieldname>: in case of field type numeric: add value from link to value in fieldname.
- ocxfs_<fieldname>: in case of field type numeric: subtract value from link from value in fieldname. This prefix can only be used with numeric type fields.
Post-Back Links
This feature has been mostly superseded by the 'Update List Field Based on Click' in the previous section |
What is a Post-Back Link and How to Implement Double Opt-in
- Post back links enable you to update the value of a list field, by your subscribers clicking on a designated link in your email message.
- The update takes place, after your email arrives, and when a recipient of yours, clicks on the post back link in your email message.
- Typically Post Back links are used for implementing double opt-in, though there are other use cases.
- Double opt-in is used when you want your list contact/subscriber to acknowledge receiving future emails, and to save their answer in an appropriate field in the list.
- For example you might have a field named DOI (short for double opt-in) which its default value is either 0 or 'N', and the post back link when clicked will change it to 1 or 'Y'. Alternatively you can use a date field, to store the date they double opted in.
- Once you create the post back, described in the following section, you can use it in your email newsletter. You use it by simply clicking on on the Link button in the email editor, and choosing the Link Type: Post-Back Link.
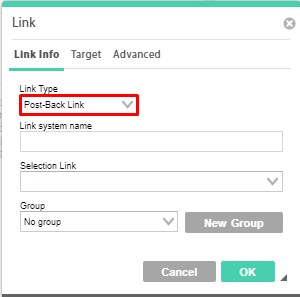
- Post-Back links are unique per list.
- They cannot be copied from list to another.
- If you are copying an HTML message from one list to another, makes sure to remove the post-back links and create new ones for that list if needed.
|
How to create Post-Back Link
- Go to List Settings → Post Back Links
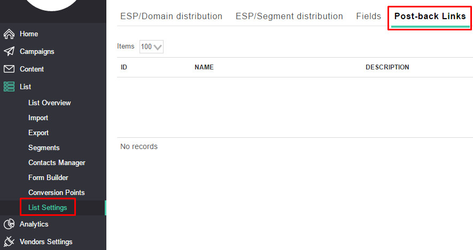
- Click on the “Create new post back link” button

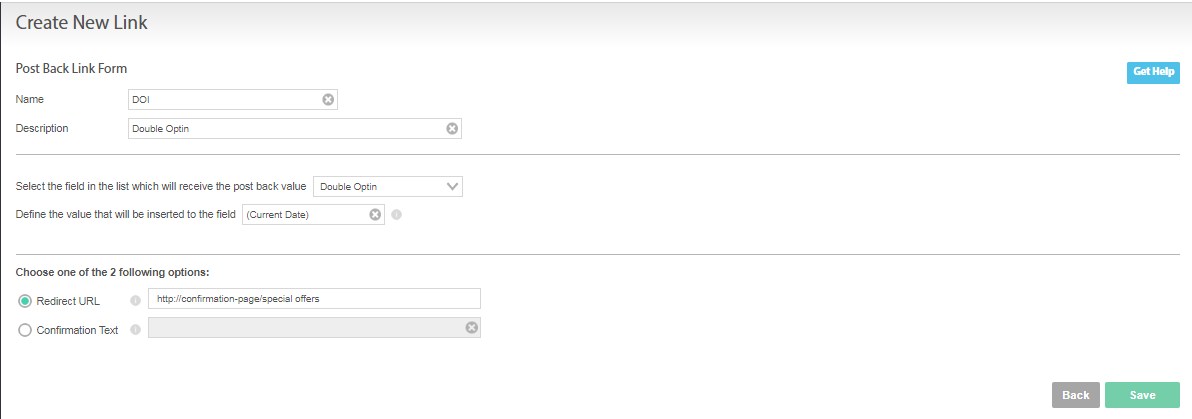
- Define the name and description of the link
- Select the field in the list which will receive the post back value
- In the case of a date field it will automatically be "Current Date"
- You can also choose the message the user will see when he presses the link, or set a URL to redirect them to, when they press on that link.
How to use Post-Back Link
When your Post Back Link is ready you can insert it into your email newsletter in the following manner
Create your email content in the WYSIWYG editor:
1. Choose the text for your Post Back Link, for instance : 'Click here if you'd like to receive emails from us'
2. Select the text and click the 'Link' icon:

3. Choose the Link Type - 'Post-Back Link'
4. Select the name of the Post Back Link you created earlier
6. Send a test Campaign and check the value got updated in the relevant field.
Note: it might take a little while for the value to be updated.
Link Groups
Overview: what are Link Groups
Link Groups are a way of getting aggregated statistics across a group of links, instead of just individuals ones. Let's illustrate this by example, let's say your email newsletter is schematically built as following:
Header & Intro

Entertainment News
    Entertainment Link 1
    Entertainment Link 2
    Entertainment Link 3

Sports News
    Sports Link 1
    Sports Link 2
    Sports Link 3

Weather News
    Weather Link 1
    Weather Link 2
    Weather Link 3

Footer |
You can create Link Groups for "Entertainment", "Sports" and "Weather", and then get aggregated stats on those groups, in order to determine for example, which group of topics gets the most clicks.
Link group stats can be used and measured across multiple campaigns. Meaning by using the same groups in many campaigns, you can get the overall click performance of those groups, over the course of many campaigns, month, months, year.
How to setup and use Link Groups
- Go to List Settings > Link Groups

- Click "New Link Group" and give a name for each category of links you'd like to get grouped stats on
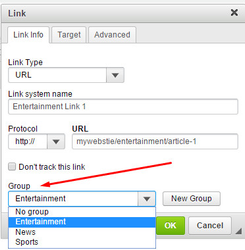
- Then in the Email Message Editor when editing a link, select the link group you'd like to associated each link with:
Appendix
About Date Fields in Ongage
- Internally Ongage stores dates in Unix Time according UTC .
- When displaying dates in the UI it then renders that Unix Time according to the format settings of the list field and time-zone of the Ongage user.


![]() Note: Updating the field values of a contact, does not change their Active/Inactive (bounced, unsubscribed, complaint) status!
Note: Updating the field values of a contact, does not change their Active/Inactive (bounced, unsubscribed, complaint) status!![]() Every contact that you bulk import using a CVS file (or via the API import command) has an Import ID associated with it. You can then use this ID for segmenting all the contacts in that import. See the following section for more details.
Every contact that you bulk import using a CVS file (or via the API import command) has an Import ID associated with it. You can then use this ID for segmenting all the contacts in that import. See the following section for more details.
![]() As of 2019 all new accounts have the following System field Import ID in their Segment criterion:
As of 2019 all new accounts have the following System field Import ID in their Segment criterion:

![]() To be noted: many accounts pre-dating 2019 were also converted to the new method that retains the last 10 import IDs, if it was found that the account had no segments using the Last Import ID. If you'd like your account to be switched to the new method, please contact Ongage Support.
To be noted: many accounts pre-dating 2019 were also converted to the new method that retains the last 10 import IDs, if it was found that the account had no segments using the Last Import ID. If you'd like your account to be switched to the new method, please contact Ongage Support.

![]() Note: Ongage will automatically unsubscribe all contacts that clicked on an unsubscribe link sent in an email from Ongage, so there is not need to do this manually! Similarly regarding hard bounces and complaints, those too are handled automatically by Ongage! These options are provided here, if you're collecting this information on your CRM, 3rd party, and/or other external sources outside of your email marketing operations in Ongage. In addition, you can also reactivate contacts from this page (but note warnings below regarding that).
Note: Ongage will automatically unsubscribe all contacts that clicked on an unsubscribe link sent in an email from Ongage, so there is not need to do this manually! Similarly regarding hard bounces and complaints, those too are handled automatically by Ongage! These options are provided here, if you're collecting this information on your CRM, 3rd party, and/or other external sources outside of your email marketing operations in Ongage. In addition, you can also reactivate contacts from this page (but note warnings below regarding that).


