Table of Contents:
Table of Contents minLevel 2
| Info |
|---|
It is recommended to peruse the parent intro section Automation Rules before reviewing the examples below. |
Update Field Examples
Responding to any change in a given list field
Use-case: Let's say you have an offering, where your customers can change their package level from your website. At that point you might want to send them a Transactional message confirming the package change. Here's how to implement that with any change in a list field value.
- Rule Settings
- Rule Trigger: assuming this is for existing customers, you'll choose the 'Contact created or edited' option as this will be an edit.
- Rule Frequency: Always – as you want to send this every time a customer changes their package level.
- Trigger Source: Choose API call update from your Website, or from Ongage platform, in the case of manual update by customer service personnel.
- Rule Criteria: choose the field which contains the value, and select either 'Changed To' 'any value' or 'Changed From' 'any value'.

- Rule Action: Choose Transactional
- You'll typically want to check: 'Check Contact Status' (i.e., don't send to inactive: unsubscribed/hard bounced/complained) and 'Check Suppression' (i.e., check against relevant suppression lists).
Update a list field with the IP of the last open
By capturing the IP and storing it in a list field, you can then use the Ongage feature 'Send by Timezone'. For details about that feature see the Campaigns help page.
...
- Do the exact same setup as above, except in Rule Settings choose Contact clicked on a link.
Transactional Message Examples
| Info |
|---|
Note: in the parent section Automation Rules you'll find an example of how to send a transactional message immediately after an Open. |
How to Setup a Drip Welcome Series
This example will send 3 emails after a contact has been created at an interval of 5 mins, 1 day and 2 days after Created Date (aka sign-up date).
- Rule Settings
- Rule Trigger: select: Contact create.
- Rule Frequency: select: Once.
- Trigger Source: Currently the API call and Ongage Platform (manual add) option is available for this scenario.
- Rule Criteria: No rule criteria needs to be selected here for setting up Drip welcome series for every contact being added into the list.
- Rule Action: Create 3 Transactional Actions and select Delay Send (Minutes) as shared below along with the desired connection in each action.
- Transactional Action 1 with 5 minutes Delay.
- Transactional Action 2 with 1440 minutes Delay.
- Transactional Action 3 with 2880 minutes Delay.
How to Setup a Confirmation Unsubscribe SMS Text Message
In order to send confirmation unsubscribe SMS Text Message, please follow the steps given below.
- Rule Settings
- Rule Trigger: select: Contact Unsubscribed
- Rule Frequency: select: Always
- Rule Criteria: In ESP Select: Sinch - As this feature works only with Sinch ESP. Please find the screenshot below:

- Rule Action: Set up Transactional Action with SMS type message. By doing so, A Confirmation SMS will be sent to all the contacts.
Send a welcome message via a different vendor connection
Ongage has a built-in welcome message as detailed in List Settings General. That setting only allows for sending a welcome message via one vendor connection. If you'd like to send your welcome messages for a given segment via a different vendor connection, here's how you can do that.
...
- You can use this method to implement your welcome messages instead of the built-in one in Ongage which only allows sending via one vendor.
- You can use this in conjunction with the built-in welcome message function, if you're using there the segmented welcome, make sure not to double target the segment you're also setting up here.
Webhook Example
Send open related data back to your CRM
- Rule settings
- Rule Trigger: select: Contact opened a message.
- Rule Frequency: select: Always (aka Ongoing).
- Rule Criteria
- None / Empty
- Rule Action: choose Webhook
- Enter Action Name
- Enter Endpoint URL
- Select the data points (List Fields, System Fields, and Behavioral Event data) associated with the open, that you'd like to send to your CRM.
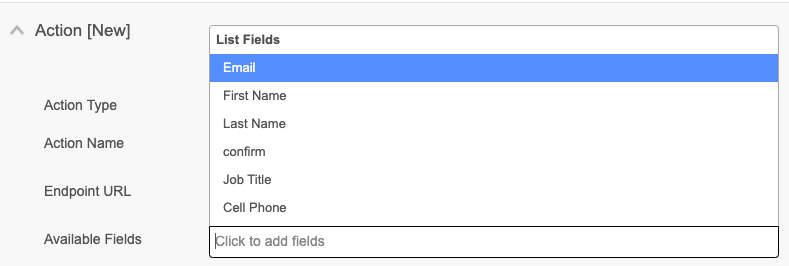
 For example you might want to send the: Email, the system Create Date of the contact, the Campaign ID of the open, and the Timestamp of the open.
Appendix
Automation Rule System Fields
Following are a new set of system fields, created for use in Automation Rules, that all start with the prefix ocxbe_(where 'be' stands for behavioral event).
Typically you can use these for updating a list field value, when using the 'Update Field' Action option or when sending Webhook.
| Name | Title |
| ocxbe_type | Behavioral Type |
| ocxbe_mailing_id | Campaign ID |
| ocxbe_email_message_id | Email Message ID |
| ocxbe_timestamp | Timestamp |
| ocxbe_esp_id | ESP ID |
| ocxbe_connection_id | ESP Connection ID |
| ocxbe_link_id | Link ID |
| ocxbe_ip | IP |
| ocxbe_country_code | Country Code |
| ocxbe_browser | Browser |
| ocxbe_os | OS |
| ocxbe_trigger_id | Trigger ID |
| ocxbe_segment_id | Segment ID |
...