Table of Contents:
Table of Contents minLevel 2
Configurable Email Preference Center
| Info |
|---|
Ongage offers a fully configurable PHP & JavaScript email preference center package (made up of 4 files) that can be easily integrated into your PHP based website without any coding. |
- Setup a fully tailorable preference center on your website that communicates directly with your Ongage account enabling your subscribers to update their contact details, mailing preferences, as well as unsubscribe and/or delete themselves from your Ongage list.
- Choose which options, buttons and fields are accessible in the form by simply editing the Config.php and index.html files.
- This preference center addresses GDPR requirements for those that require it.
- Download the following zip: contact_preference_sdk.zip containing the following files:
- Config.php
- index.html
- OngageConnect.php
- server.php
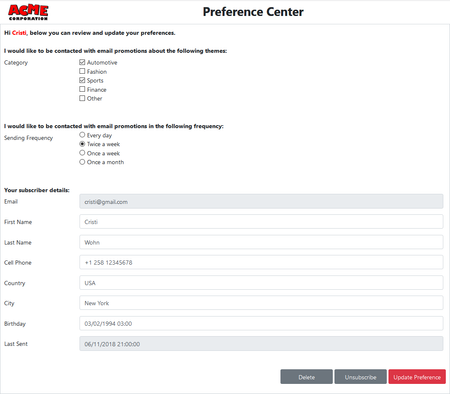
- There's no need for any Ongage API coding, as the code is built-in to these files. All you need is for your webmaster to configure these files into your website, if it is a PHP based website. Here's just one example of how this page can be configured to look like:
Technical Details
Config.php
- By default all list fields in your list will be view-able and edit-able from the form. However if you want to limit which fields are view-able and which are edit-able you have the following 2 arrays:
- visible_list_fields
- editable_list_fields
- When you add one or more list fields to either of those arrays, then only those fields indicated will be view-able and/or edit-able.
index.html
See inside commented section of this file for instructions and examples of how to implement check-boxes and radio buttons in this preference center form
| Code Block |
|---|
                 /**
				 * Configure checkboxes fields
				 *
				 * Each key of the checkbox object must be real list-field name and it must contain an inner object with the following keys:
				 *
				 * The checkbox object assumes you saved some data in a format similar to this example: "value1,value2,value3" (notice the "," delimiter)
				 *
				 * delimiter - string - the delimiter you used in your contact's list field
				 * options   - object - with the following format: {value1: 'Title 1', value2: 'Title 2'}
				 *
				 * If contact's "checkbox" list-field value is not empty - The checkboxes that contains the contacts values will be checked
				 * In contact's "checkbox" list-field is empty           - Non of the checkboxes will be checked
				 *
				 *
				 * **********************************
				 * * Example of the expected format *
				 * **********************************
				 * (This example will output one form group with two checkboxes)
				 *
				 * checkboxes = {
				 * 	// Field name
				 * 	list_field_name: {
				 * 		// String delimiter
				 * 		delimiter: ',',
				 * 		// Checkbox options {value => label}
				 * 		options: {
				 * 			option_value_1: 'Option title 1',
				 * 			option_value_2: 'Option title 2'
				 * 		}
				 * 	}
				 * }
				 *
				 *
				 *
				 * @type {object}
				 *
				 */
				checkboxes = {},
				/**
				 * Configuring radio buttons
				 *
				 * Each key of the radio buttons object must be real list-field name
				 * The inner object must have the following format:
				 *
				 * {value: 'title'}
				 *
				 * In case user's list-field value is empty - non of the radio button will be marked
				 *
				 * **********************************
				 * * Example of the expected format *
				 * **********************************
				 * (This example will output 1 form group with 2 radio-buttons)
				 *
				 * radio_buttons = {
				 *	// Field name
				 *	list_field_name: {
				 *		// Radio buttons options
				 *		option_value_1: 'Option title 1',
				 *		option_value_2: 'Option title 2',
				 *	}
				 *}
				 *
				 * @type {object}
				 */
radio_buttons = {}; |
How to Use This Preference Center as your Primary Unsubscribe Page
If you're using this preference center as your main email unsubscribe page, you'll need to do the following:
...
- One link to the preference center with accompanying text about changing one's mailing preferences (e.g., mail topics, frequency, etc.)
- And a second smaller link at the bottom to unsubscribe from all mailings directly from the email.
- In that case customer , customers will typically also choose the "Add Unsubscribe Confirmation Page" in the Email Settings.
- And they might also choose the "Success Page Redirection" option – to anyway send them to the preference center just in case they may want to resubscribe.