| Table of Contents | ||
|---|---|---|
|
Intro
The Fields Setup screen is where you can setup all the fields (aka data points) you'd like to associate with each contact in a given List. For example, First Name, Last Name, Gender, City, State, etc.
- The Ongage system comes with one mandatory field "email" and several sample fields.
- Out-of-the-box, your Ongage, account contains several additional list fields besides the email, provided as a sample, which you can choose to keep or remove based on your needs.
- The only field that cannot be removed or renamed is the "email" field.
- The number of fields allowed in your account is dependent on the Ongage package you purchased (see our pricing page for details). Speak to your account manager if you need more list fields.
How to add a field to a list
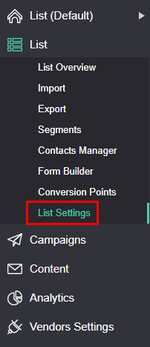
- On the main menu bar under the List menu item click on List Settings:
- Select the Fields Setup tab:


- Click Add New Field button to start creating a new field.
- Enter Field Name and Title
Select the type of field you'd like to add (i.e., String, Email, Date, Numeric, see more information about this in the following section).
Note: You can determine if that field should be mandatory or not when adding a contact to this list. As noted above, by default, only the email field is mandatory, and for most use-cases there's no need to add additional mandatory fields, though each business can set this according to their own requirements. - Click Save to complete.
What are the different field types
There are currently 4 different types of fields available in Ongage:
...
| Info |
|---|
See our List FAQ for recommendations on which field type should you use for ZIP codes, Phone Numbers, etc. |
What is the max size of a string field
In Ongage there are 3 types of String fields:
...