Table of Contents:

Subsection Pages

Introduction
There are currently 3 major types of campaigns in Ongage
- Bulk campaigns (aka marketing or blast campaigns): are campaigns that you schedule to send to one or more segments. E.g., a daily, weekly or monthly newsletter to all your subscribers, is one such example, where one newsletter goes out to a bulk of recipients on your list.
- Of course you can target specific audiences using segments, and target them with tailored content relevant for that segment.
- Moreover you can use our dynamic content features, to send different content to different contacts in the very same campaign! For example, send in the same campaign, 1 set of content to all contacts from New York, and a different set of content to contacts from Los Angeles.
- Ongage does also offer Split (aka A/B Test) campaigns, which are a special case of these marketing campaigns.
- Event & Trigger (aka drip campaigns): are campaigns that based on an event (e.g., initial sign-up date) it sets-off a series of emails messages, that are sent spread out over time (days, weeks). For example a series of on-boarding messages to new users, or a set of messages designed to nurture leads to convert to paying clients, etc. (more about these see in this How-To section below).
- Transactional mailings (aka autoresponders): is an email message that is sent immediately to one individual recipient. For example a welcome email when someone subscribes to your list, or a receipt, when someone purchases a product, are two classic examples of transactional email messages. Every list in Ongage comes with one ready-made transactional campaign already setup, and it is typically used for your welcome email campaign. For more about transactional campaigns see our API Guide or our built-in welcome emails to be found in our List How To.
The Main Campaign Related Menu Items
| Campaign Overview & Setup | Campaign Analytics |
|---|
| |
Campaigns General
The Ongage Campaign Overview
- Go to: Campaigns → Campaigns Overview
- The Campaign Overview, provides marketers with a list of all campaigns in system, ranging from campaigns scheduled to go out in future, to campaigns in process and completed. The dashboard includes rich search options, so you can easily find the campaign information you might be looking for. Furthermore, marketers have quick and easy access to key info about each campaign, whether it be messages used, segments targeted, ESP / SMTP connections, campaign size, and access to the campaign snapshot report – which provides a detailed overview of completed campaigns.

How to Send a New Campaign
- Click 'New Email' button. A simple step by step wizard will now be available:
- Step One: Enter the Email Name, Description and Subject, Unsubscribe management
- Step two: Enter the actual content of the email. You may either use the WYSIWYG editor, or click the +Template button to use any of the ready-made templates.
Once clicking 'Configuration' you will be taken to a preview of your email campaign. If you are satisfied with the way campaign looks like, you can proceed to the next step. - Step Three: Here you define your Campaign. Enter Campaign Name, Description and select the targeted Segments. Click 'Schedule'
- Step Four: Schedule your campaign – you may choose to launch now or set a future date and time. Here you may also define the 'Mailing Notification' to help you monitor the campaign from outside the platform
How to Send a Test Campaign
Before you send out a campaign, it is highly recommended you send a test campaign first.
- A Test Campaign provides the following:
- Overall final stage sanity-check of your HTML email message.
- Check how your HTML Email renders in various ISPs (e.g., Outlook.com, Gmail, Yahoo, etc.). Check you're links, check personalization using dynamic variables, and unsub link.
- Check the various ESP connections you're planning to use for this campaign
- How to send a Test campaign:
- Go to Step 3 of Campaign Configuration.
- Choose a vendor connection for this test.
- Enter the email addresses to send test to, one per line, or choose a White-list Segment.
- Recommended: check the 'Run mail-tester' option.
- Offers in-depth spam analysis of your email content.
- Provides a score indicating how clean (or not) all aspects of your email are. The higher score the better, and will have better inbox placement.
- Provides a detailed score on each element, so you can see each problem area, in order to fix and improve your score.
- Provides sending domain authentication analysis and sending IP blacklisting.
- Click on the 'Test Now' button.
Advanced Campaign Configurations
Campaign Quota
- Email Quota allows users to limit the total amount of emails to be sent out in a given campaign
- In the third step of email edit, user may choose to define the email quota for the Campaign
- Quota per ESP routing contain 4 different options of distribution:
- Single ESP
Mark “Campaign Email Quota (?)” will open option to define global quota

Note: The total quota is relevant also to all other routing options below.
Click the radio button “Numbers (Quota)” will open the option to enter a quota for the other 3 routing options:

- Multiple ESP – set quota for each ESP

- ESP / Domain – set quota for each ESP per domain

- ESP / Segment – set for each ESP per segment

For all of these options you can also choose to do distribution by %, and then set a global quota as detailed in the case of Single ESP above
What is it useful for
There are few reasons to use the Email Quota function
- Improve your ramp-up practice (see Throttling)
- Assure you meet your ESP sending limit and do not exceed it
- Control the total volume of emails sent, in regards to your ESP Pack limitations
How Does Quota Work
It randomly selects a set of members that meets that quota number, from the full set target segment
If there are several segments targeted, it will proportionally select members from each segment, so more members will be selected from a large segment and less from a smaller one
Advanced Campaign Sending Options
These options you can find on the 'Campaign Scheduling' Page:

Campaign Throttling
Intro
- Throttling allows you to control the amount of email messages sent per hour for a given campaign.
- So for example, if you have a segment of 10,000 contacts, you can choose throttle (spread out) the campaign over 10 hours, in that case Ongage will send 1000 messages each hour for 10 hours.
- Campaign throttling may sometimes be used during the warm-up of a new IP/SMTP connection. Some marketers may also choose to use this feature when sending to less active segments.
Setup
- Go to the 'Sending Options' panel
- Check the 'Enable Campaign Throttling' radio button.
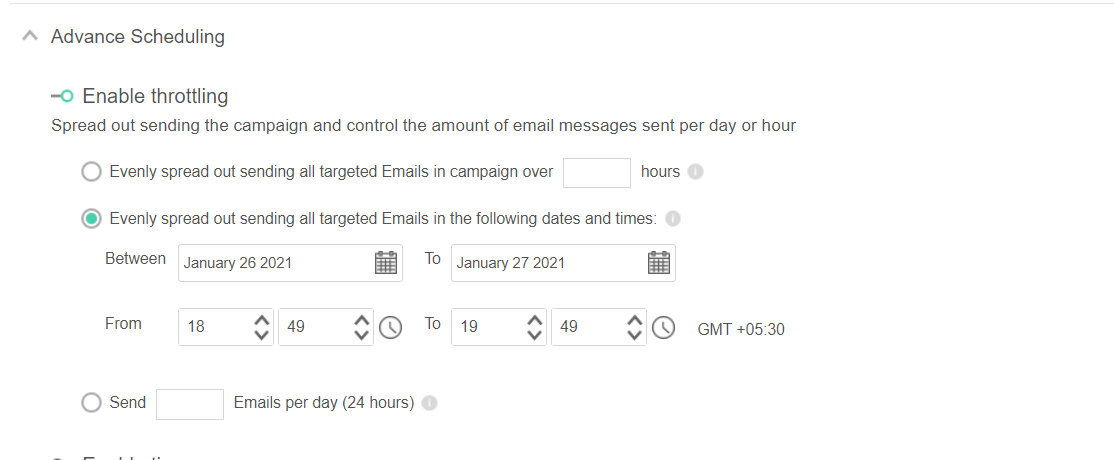
- Choose one of the three throttling methods, including a Dayparting method added in June 2019, which enables marketers to throttle a single campaign over several days but to send only during a certain time range on each day.
- Recent changes implemented in UI also allows sending across multiple days, but only during a certain time range on each day. For example, send only during relevant waking hours of 8:00-23:00 on each day.

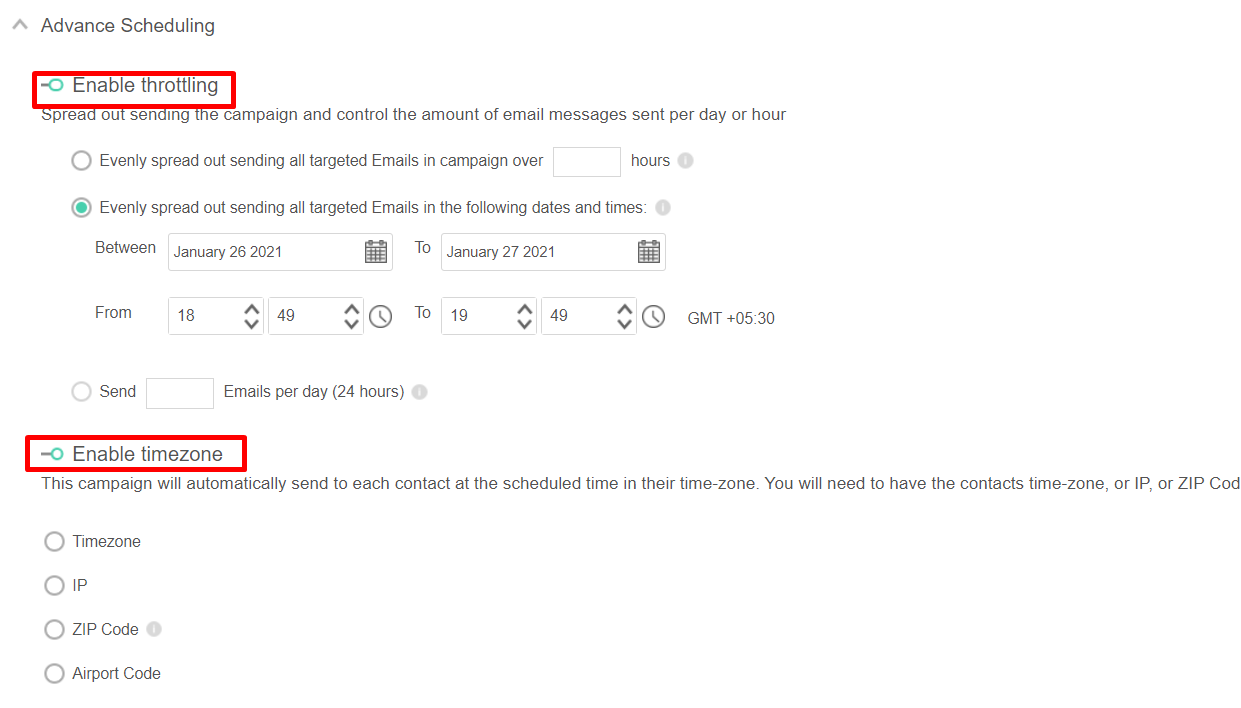
 You can also configure throttling and sending by timezone both at the same time. Simply enable both toggles on the scheduling page as shared in screenshot below.

Send by Timezone
Intro
- This feature enables marketers to schedule one campaign that will send at different times, based on the time-zone (IP, ZIP Code or Airport Code) indicated in each contact's list field. So you can schedule one campaign that will send out at 8am ET to all contacts in ET, and then send at 8am CT to all contacts in CT, and so on and so forth.
- This feature requires that you have the timezone (or IP, or ZIP Code, or Airport Code) for each contact, that you will store it in a List field. For contacts that you don't have any timezone indication, they will receive the campaign at the indicated campaign start timezone time (see details below).
- The list field you create for storing the time-zone offset should be either numeric or string.
- In case of numeric, indicate number of minutes relative to GMT (e.g., 120 for GMT +2:00 and -300 for GMT -5:00).
- In case of string, use the tz database convention, for example: America/New_York, Europe/London, etc. This convention takes into account DST.
- If you don't have the time-zone of your contacts but do have either the IP, ZIP Code or Airport Code, then you can use a List field that contains one of these values in order to use this feature to send-by-timezone. In the case of ZIP codes, only US ZIP codes are supported.
Send by timezone setup
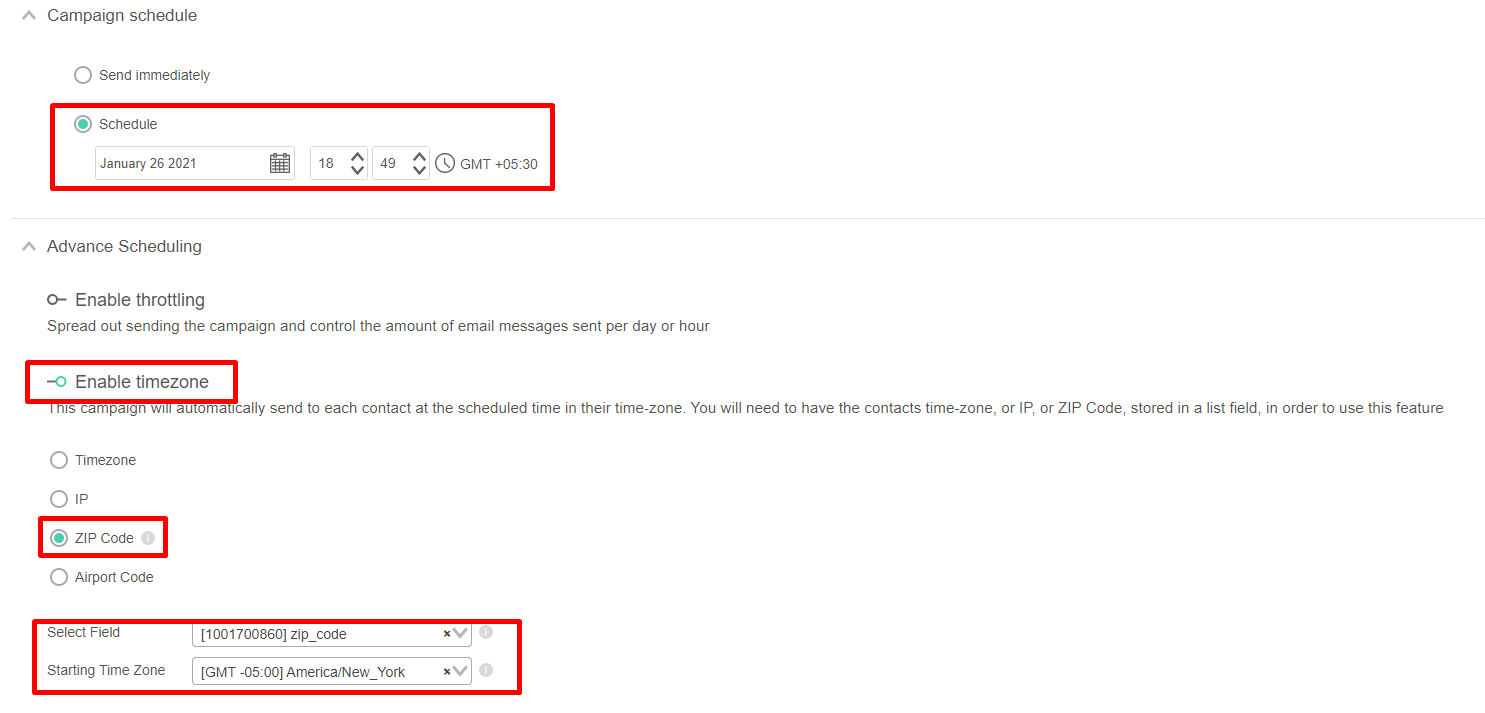
- On the 'Campaign Scheduling' page, select the time you'd like the campaign to launch at in each time-zone. Lets say for example 8:15am:

- Choose the List field that contains either the Time-Zone, IP, ZIP Code, or Airport Code, for each contact so that when the campaigns prepares to send it will look at the appropriate list-field to determine the time-zone for that contact.
- Select the campaign time-zone – indicates from what time-zone to start sending. In the case of North America, one would typically select East Coast Time, as the timezone for the campaign to start sending at.
 The reason for this last setting is as follows: lets say your DB is for North America, but (unintentionally) you have in your DB one contact who's timezone is Beijing China (GMT +8 hours). In such a case the campaign will start pre-processing at GMT +9 hours, send to that one contact, then suspend for over 12 hours (!!) and after that, continue sending to contacts in the East Coast of North America. By indicating that you want the campaign to start sending at East Coast time, you're telling the system to ignore anyone who might have a timezone prior to East Coast. If there are any (or if there are contacts with no timezone indication), they will get the email at the East Coast start time.
How To Stop and Resume a Campaign
- You can stop a campaign in progress.
- Having said that, it should be used with caution and should by and large be used as a last resort in order to prevent a campaign from going out, for whatever reason, e.g., incorrect info in the body of the email.
- If you stop a campaign during the pre-processing, i.e., prior to the schedule date, or up to and including 10% progress, you'll be able to completely stop the campaign from going out. Stopping a campaign anytime after that, will cause the campaign to stop sending, after some or most, of the emails have already been sent. The later you attempt to stop it, i.e., its progress status is in the high percentages, the less chance there is of stopping it.
- You can resume a campaign after it was stopped. The same cautions apply as in the 2nd bullet noted above.

Campaign Statuses
 You can hover over the status of a campaign, in the Status column in order to get more info about that campaign's status
- New: a new campaign, is one that you started setting up, you saved the configuration (step 3) but did not yet set a schedule date.
- Scheduled: a new campaign that is scheduled for sometime in the future, and has not yet started to send.
- In Progress: a campaign that is getting ready or has started to send (which first includes pre-processing, and then the actual sending process. See our FAQ on pre-processing here).
- Stopped: is a campaign that a user clicked on the 'Stop' button icon (see more details in section below).
- Completed: campaign completed successfully.
- Error: campaign was not sent at all, due to an error, hover over the error status of that campaign to get more info about the error.
- Completed with Errors: campaign was sent, but there are some errors, and not all emails were sent. Hover over error status of that campaign to get more info about the error.
- Cancelled: When you delete a Scheduled or Stopped campaign, those campaigns will get a Cancelled status. When you choose this filter from your campaign dashboard you can view campaigns with this status.
- Deleted: Campaigns that were deleted from your dashboard. When you choose this filter from your campaign dashboard you can view campaigns that were deleted.


![]()


![]() You can also configure throttling and sending by timezone both at the same time. Simply enable both toggles on the scheduling page as shared in screenshot below.
You can also configure throttling and sending by timezone both at the same time. Simply enable both toggles on the scheduling page as shared in screenshot below. 

![]() The reason for this last setting is as follows: lets say your DB is for North America, but (unintentionally) you have in your DB one contact who's timezone is Beijing China (GMT +8 hours). In such a case the campaign will start pre-processing at GMT +9 hours, send to that one contact, then suspend for over 12 hours (!!) and after that, continue sending to contacts in the East Coast of North America. By indicating that you want the campaign to start sending at East Coast time, you're telling the system to ignore anyone who might have a timezone prior to East Coast. If there are any (or if there are contacts with no timezone indication), they will get the email at the East Coast start time.
The reason for this last setting is as follows: lets say your DB is for North America, but (unintentionally) you have in your DB one contact who's timezone is Beijing China (GMT +8 hours). In such a case the campaign will start pre-processing at GMT +9 hours, send to that one contact, then suspend for over 12 hours (!!) and after that, continue sending to contacts in the East Coast of North America. By indicating that you want the campaign to start sending at East Coast time, you're telling the system to ignore anyone who might have a timezone prior to East Coast. If there are any (or if there are contacts with no timezone indication), they will get the email at the East Coast start time.
![]() You can hover over the status of a campaign, in the Status column in order to get more info about that campaign's status
You can hover over the status of a campaign, in the Status column in order to get more info about that campaign's status