Table of Contents:
How to Add and Manage Ongage Users
- Here you'll find info on how you can add and manage your Ongage users who will be accessing and using the Ongage marketing platform.
- Ongage offers a variety of roles and access permissions, see details below.
How to Add a new Ongage User
Note: Only users with ‘Admin’ privileges can create a new user.
- Click on the ‘Settings’ drop-down menu in the upper right hand side of the application and select ‘User Management'.

- The User Management page will open. Click on the ‘Add User’ button.

Note: if the ‘Add User’ button is greyed out that means you have exceeded the amount of users allowed for this account.
Please contact your account manager or Ongage sales to increase your number of allowed users, or delete old no longer in use users. - The following 'Add New User' dialog popup will open after the clicking on 'Add User' button above.

 We recommend making the username and email the same.
- Choose the role type (see following section for more details).
- If desired, set which list(s) this user can have access to.
- You can also control wether the user will have access to Ongage via the API and/or UI (User Interface of the Ongage Web App).
- Click ‘Save’.
User Roles and Access Permissions
Only users with ‘Admin’ privileges can create a new user.
When adding a new user, an Admin can choose any one of the following user roles (types) below, each with its own set of access permissions.
Admin users can see all other users in their account. General users can only see/edit their own user. All other roles can't access the User Management page.
Admin
- Create/Edit and view all other user roles (including other Admins), but cannot change the role of any other admin.
- Can access all lists and cannot be restricted to any list.
- Has access to the 'Account Profile' page.
- Can control list access for all other non-admin users.
- Has complete access rights to every page, menu and sub-menu in platform.
- Has export rights.
Admin Manager
- The Admin Manages has all the permissions of a regular Admin noted above.
- What makes it different from all other Admins, is that a regular Admin cannot change the settings of an Admin Manager. An Admin Manager can change the role and access of other regular Admin users.
- The first person that opens a new Ongage account will have this permission and the label will read 'Admin Creator'.
General User
- Has full access to:
- Campaigns: and all sub-menus.
- List: and all sub-menus including import, export and add/update contact.
- Content: and all sub-menus.
- Analytics: and all sub-menus.
- Vendor Settings: and all sub-menus.
- Account: access to most sub-menus but limited access to Account Profile page.
- Does not have access to:
- Can be limited to specific lists.
- Account:
- Limited access to Profile page. Cannot edit Company Info and cannot see the Account Limits table.
- User Management: can only see their own user (can't see create or edit any other user).
- Lists Manager: cannot change the default setting of a list.
- Finance: no access.
General User (No Export)
- Is a special General User type without export permissions.
Email Marketer (No Import/Export)
- Has access to:
- Campaigns & Content: all menus and sub-menus.
- List: access to Overview, Segments, List Settings, not including 'General' List Settings.
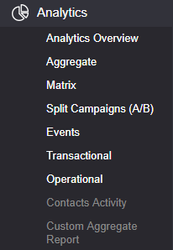
- Analytics: access to all sub-menus except 'Contact Activity' and 'Custom Aggregate Report' (the latter exception is one of the main differences from Email Marketer (No List Settings) below).
- Account:only has access to ESP/Domain Routing.
- Does not have access to:
- Can be limited to specific lists.
- List: no access to Import, Export, Contacts Manager, Conversion Points.
- Analytics: no access to Contact Activity & Custom Aggregate Report (another difference from Email Marketer (No List Settings) below)
- Vendor Settings: no access to all sub-menus.
- Account: no access except to ESP/Domain Routing.
Note disabled List sub-menus Note disabled Analytics sub-menus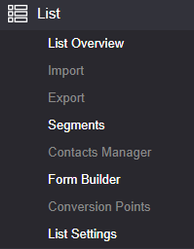
Email Marketer (No List Settings)
- Has access to:
- Campaigns & Content: all menus and sub-menus.
- List: Overview Import, Export, Segments Contacts Manager, Form Builder (compare to difference with above Email Marketer (No Export) ).
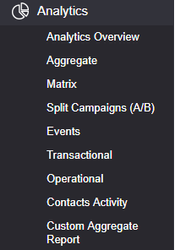
- Analytics: all sub-menus
- Does not have access to:
- Can be limited to specific lists.
- List: no access to Conversion Points and List Settings.
- Vendor Settings: no access to all sub-menus.
- Account: no access to any settings sub-menu.
Note disabled List sub-menus Note that here all sub-menus are accessible unlike Email Marketer (No Import/Export) 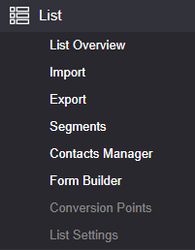
Content Writer
- Has access to:
- Content: access to all sub-menus (Email, Templates, SMS, Images).
- Does not have access to:
- Can be limited to specific lists.
- List: no access to all sub-menus.
- Campaigns: no access to all sub-menus.
- Analytics: no access to all sub-menus.
- Account: no access to all sub-menus.
Report Viewer
- This role was designed for agencies in mind that want to provide permissions to their clients to login to the agency's Ongage account, in order to see their campaign stats only (for users that need fuller Analytics access use the "Email Marketer" role).
- Can be limited to a specific list.
- Has access to:
- Aggregate Report only (and can view the campaign tab only in that report).
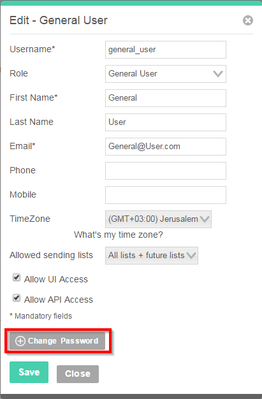
How to Reset a User's Password
- Click on the Account Settings drop-down and choose 'User Management'
- In the User section scroll down to the desired user and click "Edit"

- Click on the 'Change password' option:
Appendix
Detailed Product/Role Permissions Access Excel
For a complete detail of access to each and every section of the product per role you can download the following excel:
How to set the time zone of a user
- As of November 2019 all new accounts created in Ongage have an account level time zone setting (see Account Settings), and the user level time zone setting in those new accounts is not available.
- Accounts created prior to November 2019, but where all users had the same time zone, were also migrated to the new Account Level time zone settings.
- Accounts created prior to November 2019, that had users with different time zone settings remained as is.
Underneath the hood user level time-zone settings use universal time, that get's displayed to each user according to their specific time zone setting.
- Go to the account settings menu in upper right-hand corner of web-app and choose the 'User Management' menu option:
- Select the relevant user and in the Action column choose 'Edit'
- In the Time Zone field select and set the desired time zone value:

- Click 'Save'