Table of Contents:
Table of Contents minLevel 2
Tracking & Image Domains Setup
Intro
![]() Note: You will need access to your DNS (Domain Name Server) in order to setup the below CNAME records. Your DNS is typically used for managing your website domain and email sender domain.
Note: You will need access to your DNS (Domain Name Server) in order to setup the below CNAME records. Your DNS is typically used for managing your website domain and email sender domain.
...
| Info |
|---|
It's recommended best practice that the tracking and image sub-domains share the same primary domain as your sending domain. |
Note about DNS propagation
![]() Note: any time that DNS changes are made (like in the below) , you need to wait for DNS propagation to complete. DNS propagation usually takes a few hours, but in rare cases can take longer if it's a brand new domain, anywhere from 24 hrs - 72 hrs (i.e., 1 - 3 days).
Note: any time that DNS changes are made (like in the below) , you need to wait for DNS propagation to complete. DNS propagation usually takes a few hours, but in rare cases can take longer if it's a brand new domain, anywhere from 24 hrs - 72 hrs (i.e., 1 - 3 days).
Sample CNAME DNS Configuration
Configure the image and tracking domains in your DNS with the following values:
| Type | Name | CNAME | Sample Value |
|---|---|---|---|
| Tracking | track.yourdomain.com. | IN CNAME | your_account_id.trkpnt.ongage.net. |
| Image | image.yourdomain.com. | IN CNAME | your_account_id.imgpnt.ongage.net. |
The Ongage Tracking and Image Domain Setup Page
![]() The Tracking & Image Domains page is where you configure this in Ongage.
The Tracking & Image Domains page is where you configure this in Ongage.
There it will display the exact account ID number you need to use instead of your_account_id indicated above.
Here's how this page looks for Account ID 8882. Each account will have a different account id number indicated, for your account, it will be your account id number.![]()
| Info |
|---|
Many DNS management systems might require that you also have a "." at the end of each definition. |
Advanced Settings
Assign Tracking Domain Per List
...
- Go to Image and Tracking Domains >> Click on "Advanced" and go to "Domains per List"
- From the list of Tracking Domains added, Click on the edit button for which you want to assign the domain per list. You can also search for the list using the search option.

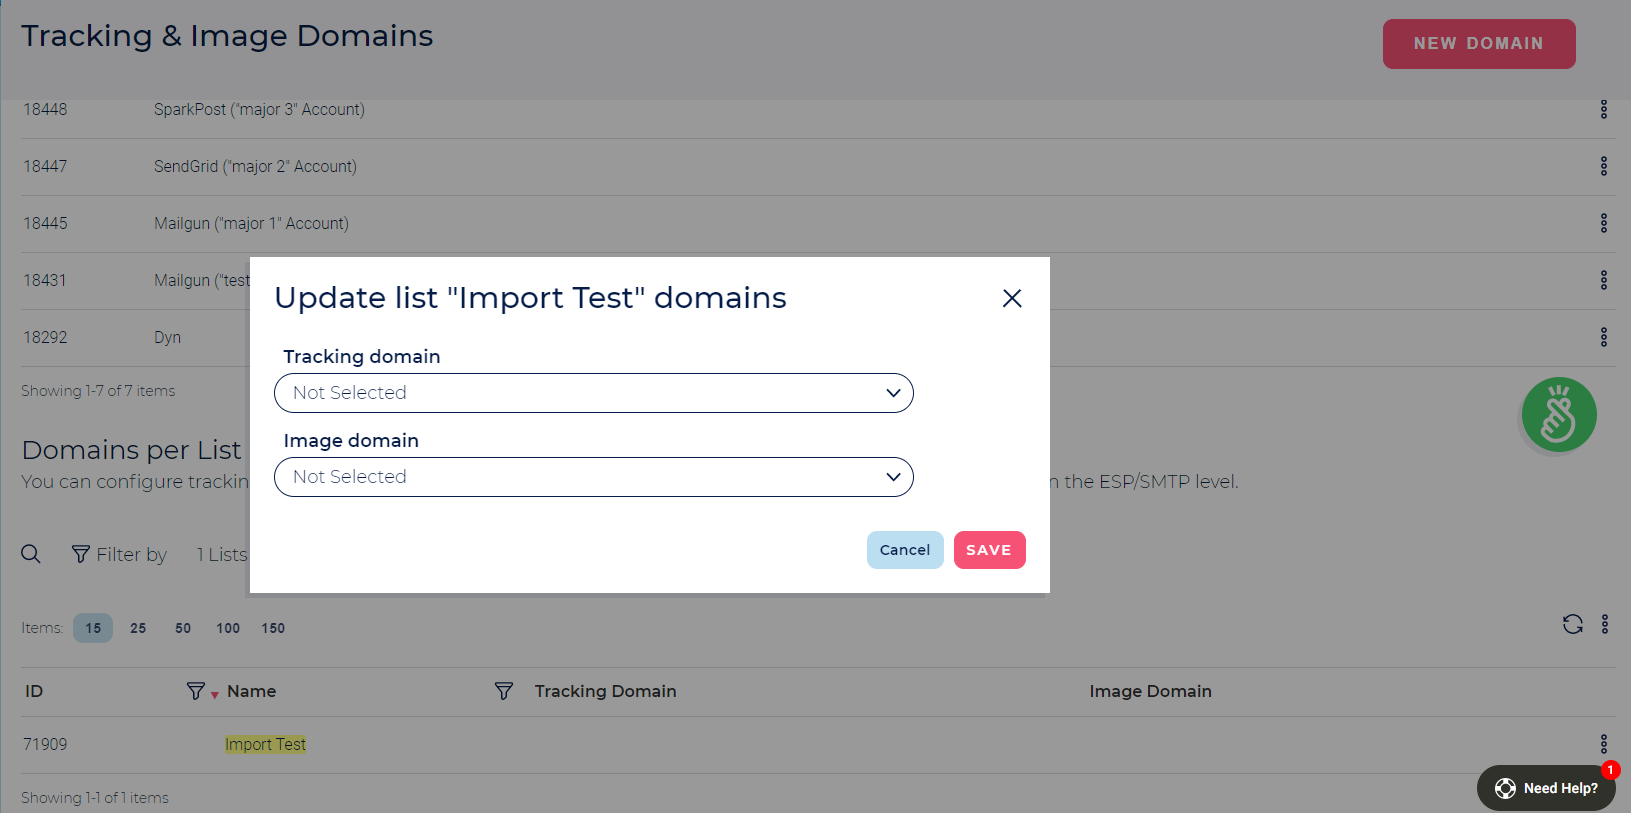
- On the pop up opened, select the Tracking and Image Domain.
![]() Note: Definitions made on the list level will overrule definitions made on the ESP level.
Note: Definitions made on the list level will overrule definitions made on the ESP level.
Assign Tracking Domain Per ESP Connection
You can add and allocate different tracking domains to different ESP connections used in Ongage. In order to do so, please follow steps given below.
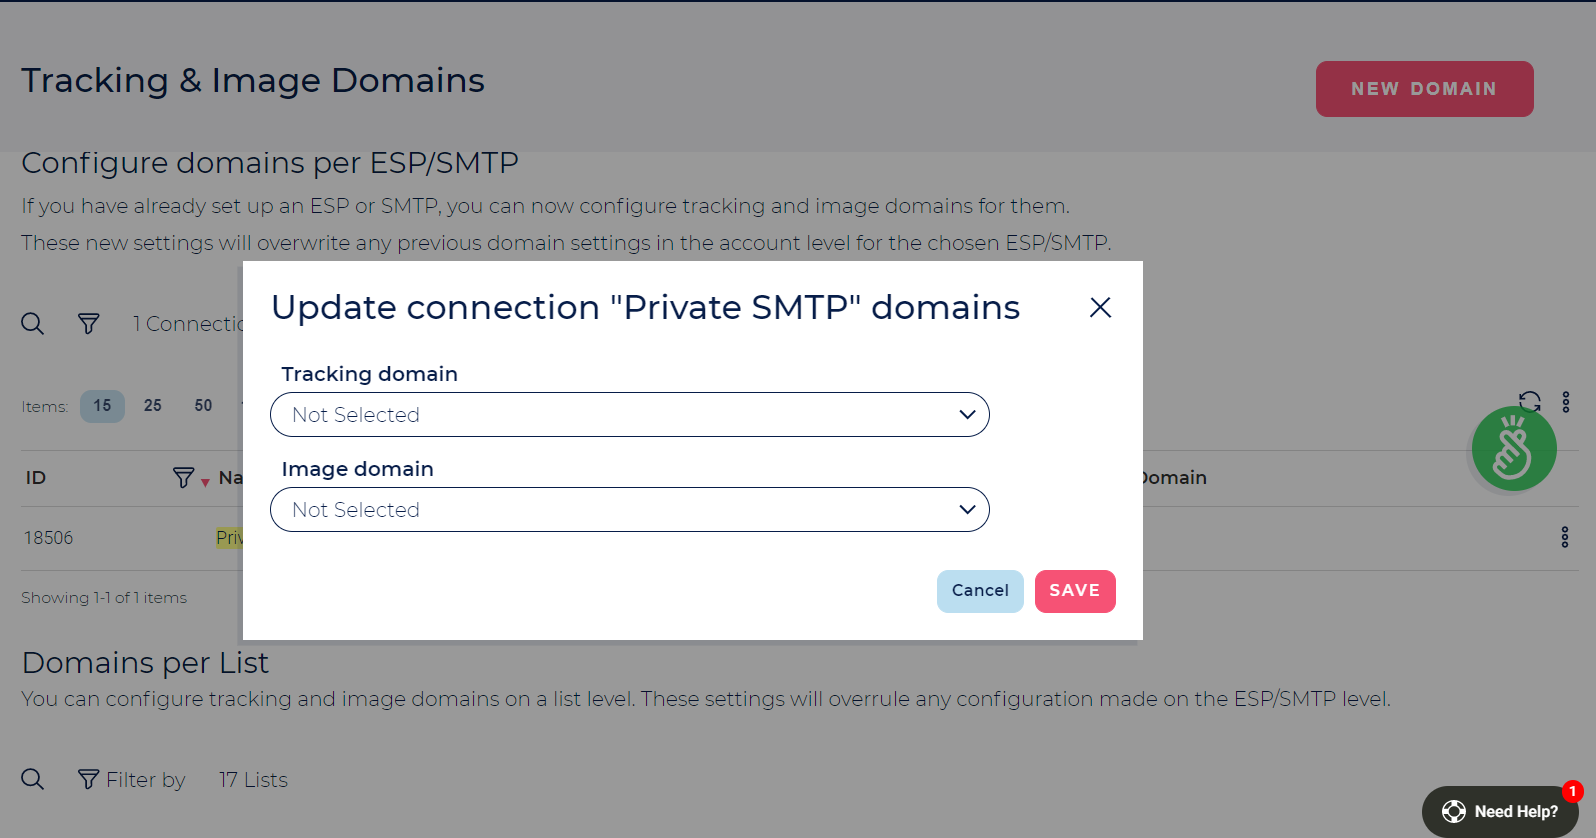
- Go to Image and Tracking Domains >> Click on "Advanced" and go to "Domains per ESP"
- From the list of Tracking Domains added, Click on the edit button for which you want to assign the ESP Connection. You can also search ESP Connection using the search option.

- On the pop up opened, select the Tracking and Image Domain.
...
- Setup ESP Connection with the From Address/Reply Address with the Sending Domain you want to use. For example: info@domain.com where domain.com is your sending domain.
- Configure a Tracking domain with a sub-domain of the sending domain. For example, configure track.domain.com as Tracking Domain as per the instructions shared above in this page.
- Allocate the configured tracking domain with the relevant ESP connection where you have used the same Sending Domain as per the steps shared above.
- Go to List Management >> Edit List in which you want to Match the Sending Domain and Tracking domain >>> Allocate the ESP connection configured above and Save.
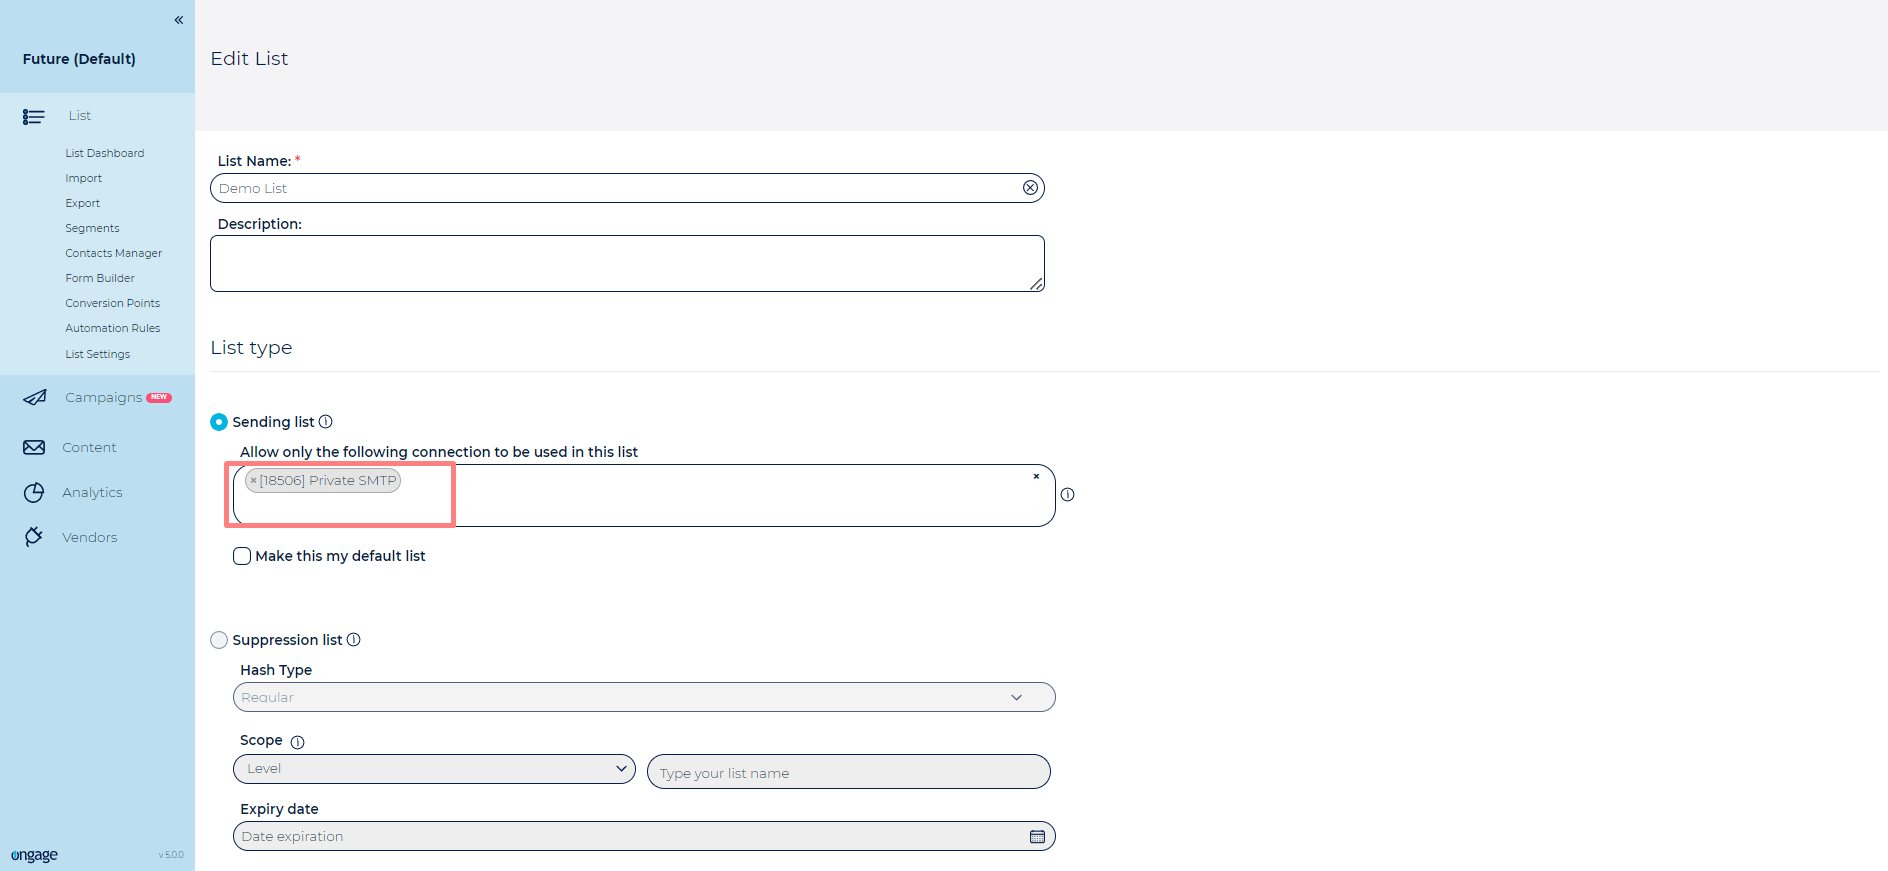
- Follow the same process from Step 1 to Step 4 above for each list in your account where there will be a List Specific ESP connection and a relevant tracking domain configured for each of your list.
![]() Note: While setting up new ESP connections with separate sending domains, you can use the same API credentials.
Note: While setting up new ESP connections with separate sending domains, you can use the same API credentials.
Self Service SSL Tracking & Image Domains Setup
Intro
| Info |
|---|
In recent years (since 2019-2020 and even before) it's become best and widespread practice to use SSL/HTTPS links in your email messages. SSL/HTTPS in general has become a universal standard for the Internet, email included. You can now setup your custom/branded Ongage tracking domains with SSL, without any need to go through Ongage Support and Ongage's back-end DevOp services. Following you'll find instructions on how to go about that. |
...
![]() Note: If you want more than 1 domain to use SSL/HTTPS, you'll have to acquire a Multi-Domain SSL certificate.
Note: If you want more than 1 domain to use SSL/HTTPS, you'll have to acquire a Multi-Domain SSL certificate.
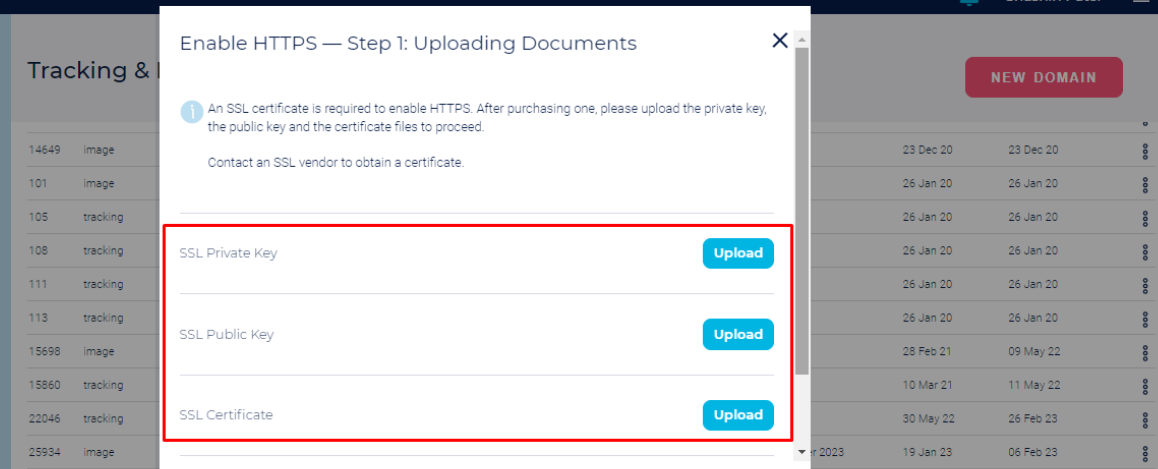
How to Add SSL Certificates for you Domains
Once you have these, please follow these steps to add the SSL certificate to your domains:
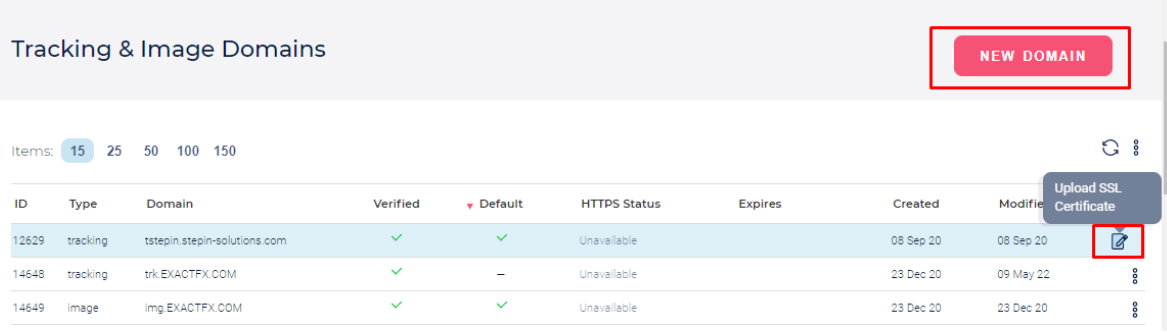
- Log in to your Ongage account.
- Navigate to 'Tracking & Image Domains'.
- Create a new domain or click on Upload SSL Certificate to an existing one.
- Add the files of the SSL: Private key, Public key and Certificate then Click on Save.
- Once you will Click on “Save”; a pop up will be there which will show CNAME records that you need to add at your DNS side. Pop up like below where it will have yourdomain.com >> CNAME >> <value>
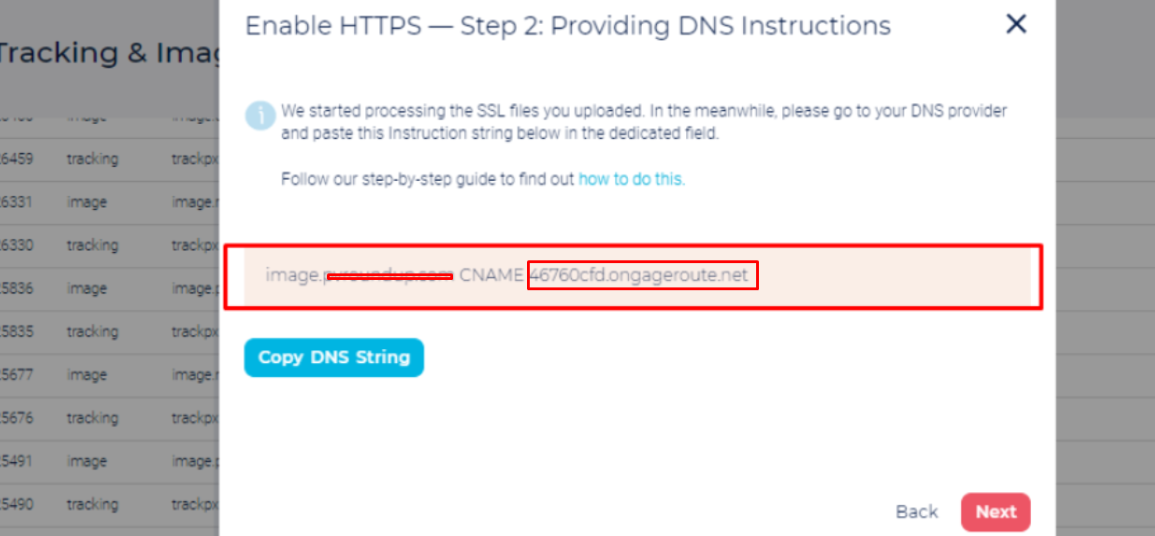
- Copy that CNAME record and add in DNS as mentioned in the instructions.
- Once the DNS values are verified, your domains will be with SSL and ready to use.
SSL Expiration Date Notifications
The Ongage platform is designed to send alerts about expiring certificates:
...
To the notification email, the customer set in the their Ongage account (See see: the Account Settings How-To Guide, for more information about the account notification email).
Appendix
Check DNS Verification & Propagation of your Image & Tracking Domains
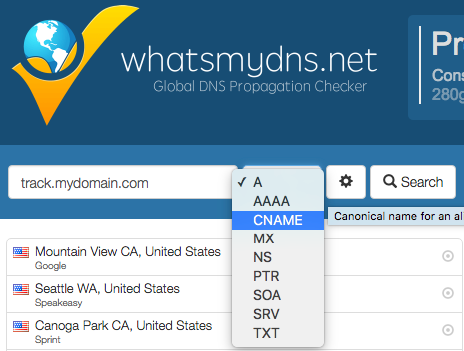
![]() Note: any time that DNS changes are made, you need to wait for DNS propagation to complete. DNS propagation usually takes a few hours, but in rare cases can take longer if it's a brand new domain, anywhere from 24 hrs - 72 hrs (i.e., 1 - 3 days).
Note: any time that DNS changes are made, you need to wait for DNS propagation to complete. DNS propagation usually takes a few hours, but in rare cases can take longer if it's a brand new domain, anywhere from 24 hrs - 72 hrs (i.e., 1 - 3 days).
DNS Query Command
nslookup
- nslookup -type=cname track.yourdomain.com 8.8.8.8 will show you the status of your tracking (and or image domain).
- nslookup -type=ns yourdomain.com 8.8.8.8 will show you where your domain is hosted and which DNS management system you need to use to set your tracking and image domains.
Google Help about creating a CNAME record
- Each hosting service has a slightly different way to create CNAME records. When in doubt, check with the particular company you're using for additional instructions.
- Google here provides info for: GoDaddy, ix web hosting, 1and1, EveryDNS.net, Yahoo!SmallBusiness, No-IP, DNS Park, Other hosting services.
For more info about DNS CNAME definitions
| Info |
|---|
You can also read more about CNAME setup in Google Support |
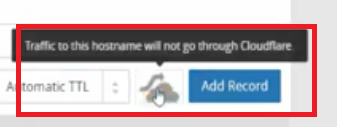
CNAME in Cloudflare not getting Verified after Configuration
In order to avoid this from happening, follow the steps below:
- Go to the Cloudflare DNS setup screen.
- Select the CNAME
- And before adding the Record click on the orange cloud icon to make it grey.
About SSL and Tracking
- The default Ongage tracking domain is implemented using regular http.
- You can setup your Ongage tracking with SSL – see earlier section above on this matter.
- Note: there could be additional costs related to SSL tracking setup.
Regarding HSTS Policy and Tracking Domains
There's another scenario, where you're using Ongage's regular http tracking, but your destination landing page is https (i.e., SSL) and not http. If you choose setup your tracking domain to be under that https landing page domain (e.g., trk.landingpage.com) then you'll need to make sure that the top level domain does not have an HSTS policy, or choose a different top level domain for your tracking that does not have an HSTS policy.
In order to check and delete HSTS settings in Chrome:
1. Enter URL chrome://net-internals/#hsts
2. Lookup subdomain under "Query Domain"
3. To specifically delete the HSTS policy from your domain Go to chrome://net-internals/#hsts > Enter your sub-domain/domain name under Delete domain security policies > press the Delete button.
4. Go to chrome://settings/clearBrowserData > tick the box Cached images and files > click the button Clear data.