Table of Contents:
Table of Contents minLevel 2
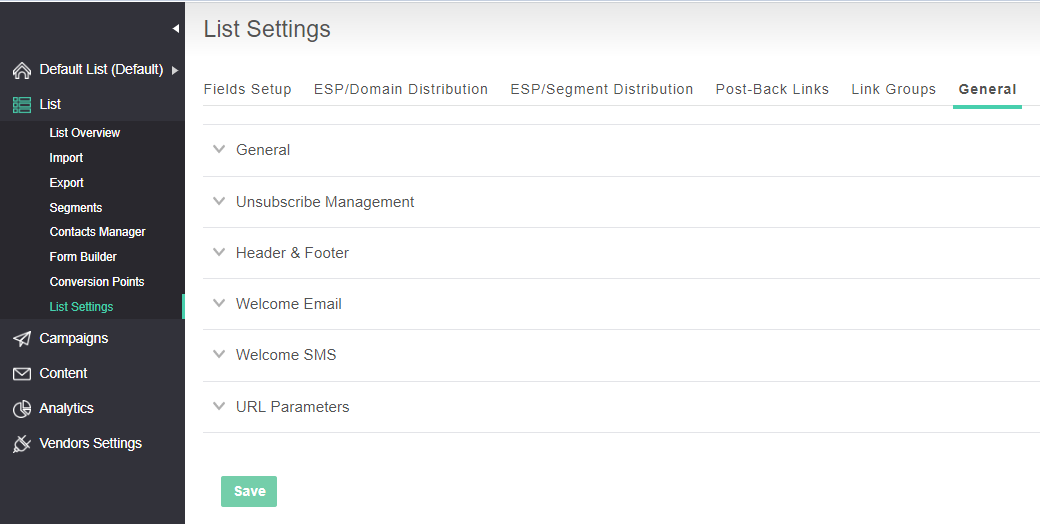
List Settings General
| Info |
|---|
The List → List Settings → General tab: is a page to manage general default settings for this List. |
How to Setup a List Welcome Email Message
![]() Ongage provides this feature so you can send a transactional welcome email to each and every new contact that joins the List (without any need to code a transactional API message).
Ongage provides this feature so you can send a transactional welcome email to each and every new contact that joins the List (without any need to code a transactional API message).
By setting this up, every new contact that is added to this List, will receive the welcome email message you select in the setup below:
- Go to List → List Settings → General Tab (see screenshot above).
- Open the 'Welcome Email' panel:
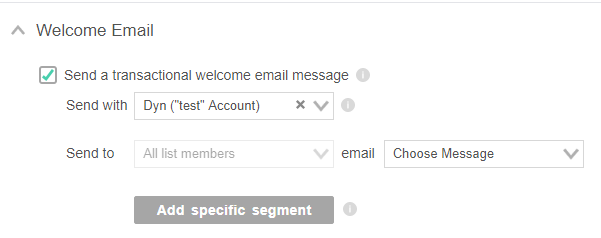
- Check "Send transactional welcome email message" checkbox to activate this feature.
- Select which SMTP vendor connection to use for sending this transactional welcome email.
- Select the email message you would like to send, from your Content → Email Message library, to all new contacts that join (get added) to this list.
| Warning |
|---|
Note:
|
| Info |
|---|
If you'd like to send several follow-up email messages, after this transactional welcome email, see Campaigns → Events & Triggers to set up sending a sequence of follow-up on-boarding messages on: 1 day, 2 days, etc. after new contacts joined this list, by using the Ongage system create date, as the base for that Event. |
How to Setup Different Welcome Email Messages for Different Segments
The segmented welcome email feature enables marketers to send different welcome messages to different on-boarding contacts, based on data-point values in their list fields.
For example:
- Send different welcome messages to contacts from different States or regions.
- Send different welcome messages based on different interests, e.g., 'Sports' vs. 'Travel'.
To setup this up:
- Go to List → List Settings → General Tab (see screenshot at the beginning of this section).
- Open the Welcome Email panel:
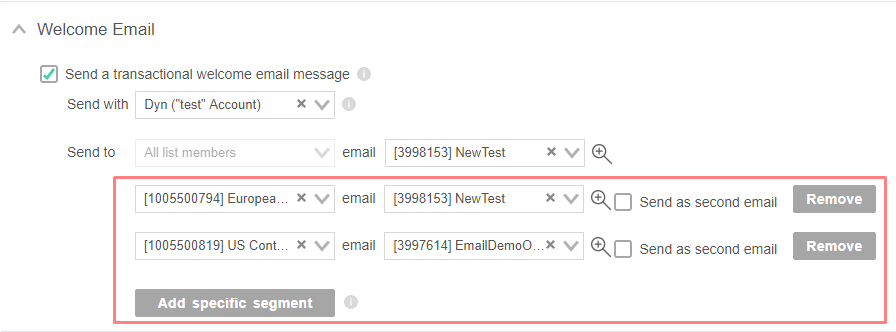
- Click on the Add specific segment button.
- Choose a different email message to send to the selected segment.
- Additionally you have the following options:
- Check Send as second email to send this segment an additional message on top of the default welcome email.
- When unchecked (which is the default setting), the selected segment will receive only the segment designated message instead of the default welcome email.
...