Table of Contents:
Table of Contents minLevel 2
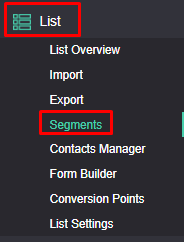
Getting Started
| Info | ||
|---|---|---|
| ||
|
Subsection Pages
Child pages (Children Display)
Advanced Segment Configuration
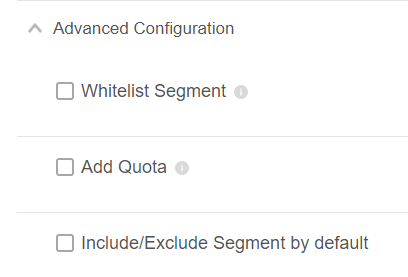
Whitelist Segment
What are Whitelist (aka White-List / White List) Segments used for
...
- Add the desired staff members/stake holders to this segment:
- Click 'Save'.
- If you chose not to include the segment by default, then you can always select it from the campaign configuration screen in the following manner:

Segment Quota aka Segment Sample
In the "Advanced Configuration" you can create a sample of the Segment based on either a number quota, or a percent of the total size of that Segment.
...
![]() Many users will typically find it more straightforward to use the Campaign Quota feature instead of this Segment Quota feature. For more about that, see Campaign Quota in our online Campaign help page.
Many users will typically find it more straightforward to use the Campaign Quota feature instead of this Segment Quota feature. For more about that, see Campaign Quota in our online Campaign help page.
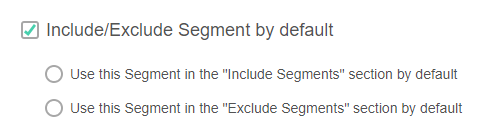
Automatic Include/Exclude Segments
- This option enables marketers to automatically include or exclude the currently edited segment, when creating a new campaign/event.
 It will only apply to new campaigns or events.
 - On the campaign configuration page you can always deselect this automatically selected segment.
Segmentation Examples
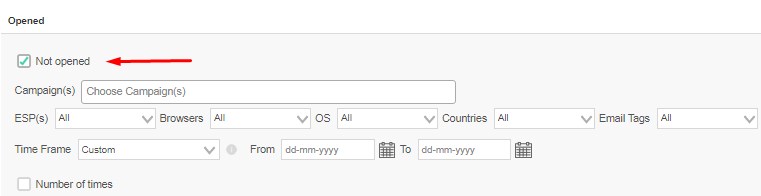
How to Create Segment that includes all members that registered in the last week and didn't open any emails:
- From "System Fields" select "Created date"
- In the criteria area select "less then" Relative 8 Days
...
- From "Behavioral: select "Opened"
- In the criteria area mark "Not Opened"
And together:
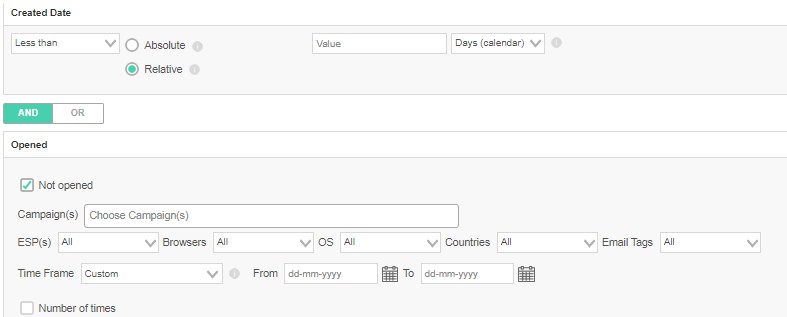
How to Create Segment of all contacts that were successfully delivered to in the last week
Successfully delivered emails, are all those that were sent to and did not hard-bounce nor soft-bounce. Since hard-bounced are anyway automatically deactivated, and not sent to, a segment of all successfully sent to, will be – all "Sent" AND NOT "Soft Bounce":
...
![]() Note: successfully delivered to, does not necessarily mean, it reached their Inbox. For that we recommend monitoring behavioral opens and clicks as a KPI that infers on Inbox placement (and/or any other folder that recipients check their emails in).
Note: successfully delivered to, does not necessarily mean, it reached their Inbox. For that we recommend monitoring behavioral opens and clicks as a KPI that infers on Inbox placement (and/or any other folder that recipients check their emails in).
How to Cool Down and Automatically Exclude Soft Bounces from the Last X Days
Intro
Typically such a Segment is used to "cool down" soft bounces for X amount of days, so as not to retarged them over and again on a daily basis, a practice that mailbox providers (e.g., Gmail, Yahoo, etc.) consider to be poor practice and can lower your reputation.
X is typically set to 1-7 days, where many marketers will choose a value of between 1-3 days.
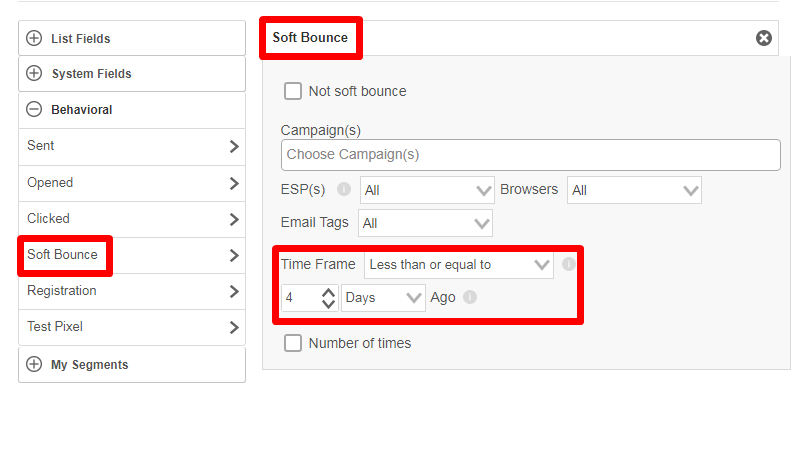
How to Setup
New Segment >> Soft Bounce >> Select Time Range as per your use case (For Example “Less than or equal to 4 days”)
To automatically exclude these soft bounced contacts, check the following option and this segment will automatically be added to the exclude segments in the campaign configuration page. Even if you choose to automatically select this segment, in the campaign configuration page, you can still decide to deselect it if you like.
How to Auto-Sunset Contacts using the Default Exclude Option
Intro
The Auto-Sunset is a process of excluding non-active users from your mailings. This can be achieved in Ongage by creating a default exclude Segment which includes contacts in your list who have Not-Opened your campaigns in the last X days.
...
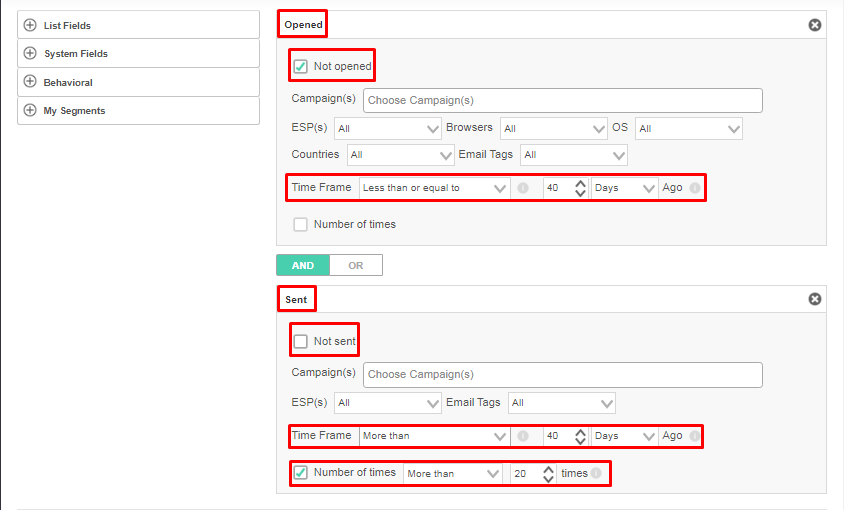
- Go to Segments >> New Segment >> Behavioral >> Add Criteria of NOT OPENED in Last X Days, For example Not opened in “Less than or equal to 40 Days”.
- Also, you need to add another Criteria of SENT with "More Than X days" range, For example “SENT More Than 20 times in the past 40 Days”.
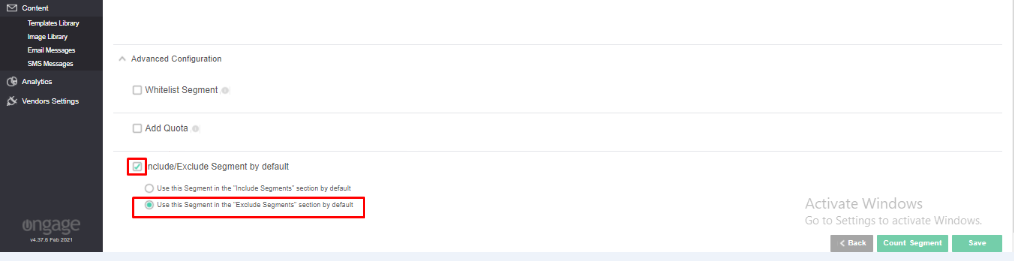
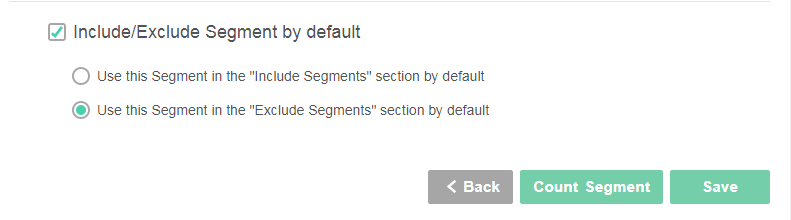
- To exclude the segment from all of your campaigns, you can do it by checking the Include/ Exclude Segment by default and Select the “Use this Segment in the “Exclude Segments” section by default”.
Behavioral Time Frames
All behavioral segmentation options contain following time frame options.
...
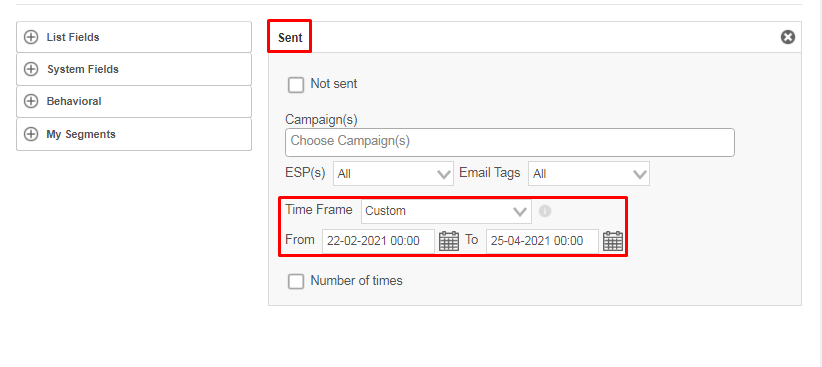
- Custom:The custom time frame allows you to select contacts Sent between any static date range along with time of the selected date. For example 20 February 00:00 to 25th April 00:00 OR 20 February 09:00 to 20 February 09:00.
- Less than or equal to: Indicates the time frame of Sent in last X days including the Xth day you have entered.
- Between: Indicates the time frame inside the indicated span. For example, Sent anywhere between 30 to 15 days/weeks/months ago.
- More than: Covers the time frame prior to the indicated X point in time. For example, Sent “More Than” 90 Days means all Sent occurred prior to 90 Days ago and backwards upto 2 years. It provides no information on what happened in period from present up until 90 days ago, so contacts in that latter time-frame might have been sent to or not.
Advanced Grouping Logic
Check "Enable And/OR Grouping" to enable grouping criteria as illustrated in the expalantion of this feature.

Add Criteria for OR Values of the Same List Field
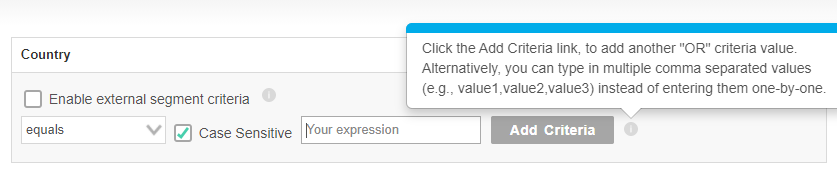
Built into any List Field criterion is the "Add Criteria" option, which enables marketers to indicate several OR values. So that there's no need to select the list field multiple times. Simply add all OR values diretly from the 'Add Criteria' button. This feature offers another shrotcut, if you have a bunch of values, instead of typing each one in, you can enter them in one line as comma separated values. You can do this for up to 1,000 values, anything beyond that, you should use the External Segment Criteria feature described below.
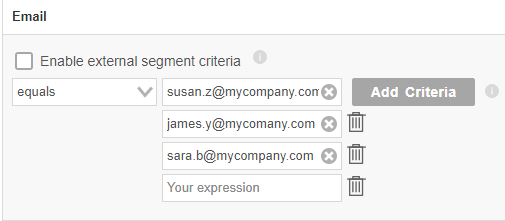
External Segment Criteria
![]() Not to be confused with external segments in section below, this is a CSV list of external criteria.
Not to be confused with external segments in section below, this is a CSV list of external criteria.
- External segment criteria is typically used for values like Zip Codes. Let's say you have a list of 10,000 Zip Codes that you'd like to target, you don't want to create a segment with 10,000 OR conditions.
- In such a case, compile all Zip codes into a CVS file, select the list field you'll use for the criteria, and upload the CSV via the 'Browse' button.
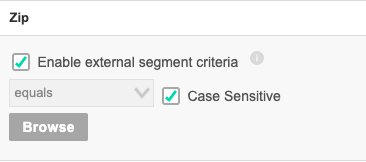
- Also, one will typically want to uncheck the 'Case Sensitive' option.
- This feature should typically not be used for emails (i.e., the email list field). If you want to target a group of emails (aka contacts) you uploaded, you could use the Import ID, or some other list field value that is common to that set of emails, e.g., state = NY or gender = female, etc.
What are External Segments
- This feature is designed to serve customers, that do email marketing from within their own CRM and don't necessarily need the Ongage front-end, or its robust segmentation and/or campaign management features, as those already exist in their CRM. On the other-hand, they are interested in Ongage's ability to easily and seamlessly connect to SMTP vendors.
- Given this scenario, this is an API feature only, and you can read more about how to implement it in our API documentation: https://apidocs.ongage.net/class-Controller_API_Segments.html#_put_populate_external
- Prior to populating the external segment, you first need to create the external segment using the regular POST /api/segments method and set the is_external to true.
- Additionally you'll want to set the external_insert_missing to true so that opens, clicks, unsubscribes, bounces, etc. can be attributed to each contact in the external segment.
- If you're using dynamic fields in the body of the message, then you'll need to add those to the external segment populate call, so when sending the message, it will pull those values from the external segment.
| Warning |
|---|
|
Appendix
What Does the Asterisk ( * ) Next to the Segment Name Mean
This means that, this segment, was changed / edited, after it was already used in some previous campaign(s).