Table of Contents:
Table of Contents minLevel 2
How to Add Custom X-Headers to Outgoing Email Messages
| Info |
|---|
This feature enables marketers to dynamically add / insert / inject a custom header into the header of every email message sent via this connection! Custom headers are also known as custom x-headers.
|
- Under the 'Actions' column select "ESP setup" for the relevant connection.
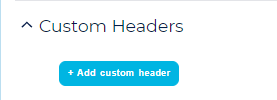
- Open the 'Custom Headers' panel, click on the '+ Add custom header' button.
- Add the desired custom header e.g.:

...
| Code Block |
|---|
X-HEADER-NAME: marketing
From: some_name <newsletter@somecompany.com>
Subject: Newsletter
Reply-To: newsletter@somedomain.com
Return-Path: bounces-3249@somesmtp.com
Content-Type: multipart/alternative;
boundary="_----3WwrS01AbB9izOtvaHw===_2F/B6-162-06C7F5" |
What values can be injected into a custom header
- Literal value e.g., 10, IP-Pool, etc.
- Ongage System Field e.g., {{ocx_mailing_id}}
- Ongage Dynamic List Field e.g., {{channel_id}} (where channel_id is a data field in your Ongage list).
...
- Add a custom header in the ESP connection as explained in above section i.e. How to Add Custom X-Headers to Outgoing Email Messages.
- While adding Custom header use any name of your choice, For example “X-HEADER-md5”.
- Under Value use “{{ocx_custom_hash}}”.

- While sending campaign, please add "{{ocx_generate_hash{algo=md5,data=\{{email}}}}}" as the first line in the body of your Email Message and use the ESP Connection in which you have configured Custom Header.
- Once above steps are done, the MD5 hashed email will be populated as Custom Header in your campaign.
Appendix
How to view an email message header
Outlook:
- Open email message.
- Click on the 'File' tab.
- Click on 'Properties'.
- View the 'Internet headers'.
...
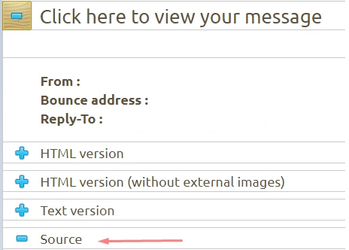
- Send an email message from Ongage to Mail-Tester (using our free built-in feature).
- View header under the 'Source' panel:
The X-Header replacement tag
| Info |
|---|
This feature is mostly deprecated and superseded by the above setting in the vendor connection setup page. The only time you might still need this is if you'd like to set this value on a per campaign basis, in which case you'll need to add the following replacement tag in the body of your email message.
|
Place the following replacement tag in the body of your HTML email message:
| Code Block |
|---|
[[esp-id:header_X-SOME-HEADER-NAME:<value>]] |
...
| Code Block |
|---|
Placing the following in the body of the email message: [[4:header_X-SOME-HEADER-NAME:marketing]] Will inject the following X-Header for all emails sent via Amazon SES connections: X-SOME-HEADER-NAME:marketing |
Using If
...
-then
...
-else in X-Header replacement tag
The "if_-then_-else" conditions can also be used as part of the Email X-Header replacement Tag.
Below example of where "email_key" is your list field and "ocx_campaign_name" is the system field. Here system will look at "email_key" first and if it is empty then will pick up the Campaign name.
| Code Block |
|---|
[[0:header_X-SOME-HEADER-NAME:{{ocx_if email_key !is empty}}{{email_key}}{{ocx_else}}{{ocx_campaign_name}}{{ocx_endif}}]] |
...