Table of Contents:
Table of Contents minLevel 2
API quick start
Want to get started with the Ongage API? Here's where to start!
...
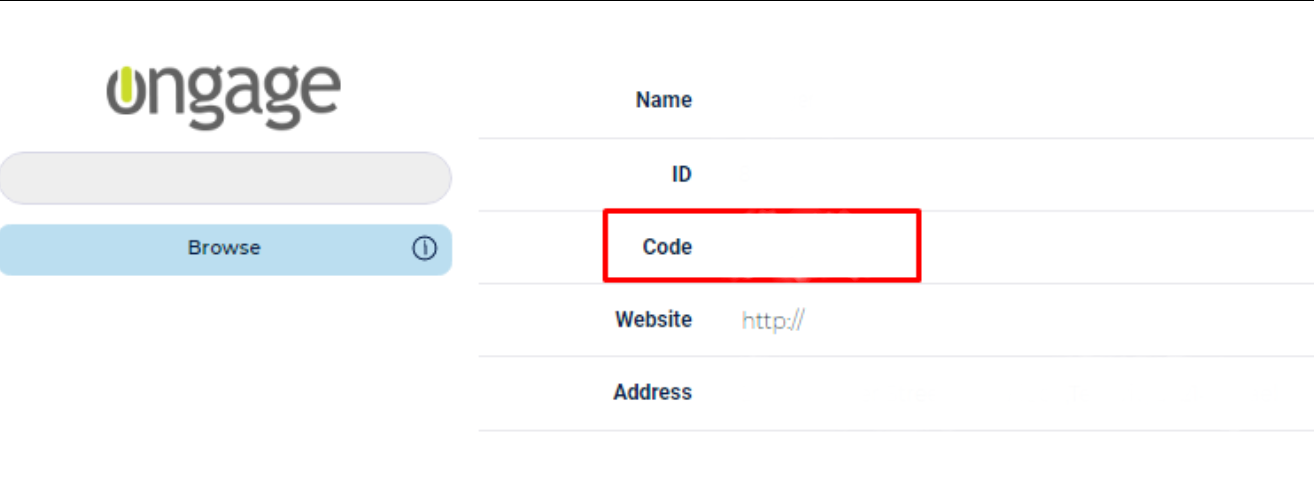
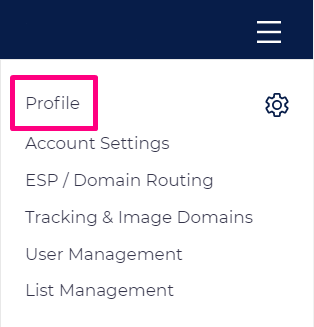
- In order to connect to your Ongage account via the API, you'll need the Username and Password of the Ongage User who will be using and issuing the API commands, along with your Account Code, that you can find under the Account Profile page:
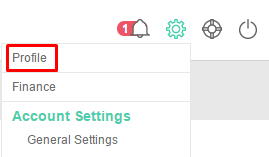
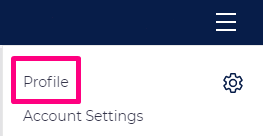
 Note: the Account Code is a unique alphanumeric string and is not the numeric Account ID
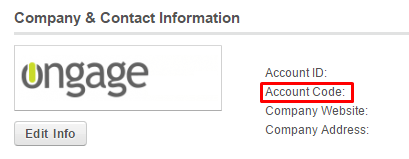
These are the credentials you'll need to send in the request header:
Code Block X_USERNAME: your_ongage_username X_PASSWORD: your_ongage_password X_ACCOUNT_CODE: your_ongage_account_code
![]() It is recommended that the API User be either an Admin or General User. For a list of user types see the User Management help guide.
It is recommended that the API User be either an Admin or General User. For a list of user types see the User Management help guide.
...
![]() Also see our API Code Examples section.
Also see our API Code Examples section.
How to Indicate List Id in Ongage API Calls
There are a variety of few ways to indicate which List ID you want to address when issuing an Onage Ongage API call.
Since there are several ways to indicate the list_id in an API commandthat's the case, a precedence is required.
Following please find is the list_id indication precedence in order from the highest to lowest precedence:
- In the request body: POST api/mailings { "list_id" : 1111 }
- In the query param: https://api.ongage.net/api/mailings/?list_id=1111
- In the URL route param: 1111https://api.ongage.net/<list_id>/api/mailings
- Use The system will use the account's default list ID, when no list id is indicated at all!
...
For example:
- If a user has indicated List IDs at all 3 possible places as shared in the example below, then in this case list_id=3333 will be the one that applies.
POST 1111/api/mailings?list_id=2222 { "list_id" : 3333 } - Between query param and route param, List ID indicated as query param takes higher precedence. So, if the List IDs are indicated as below, then the system will use list_id = 2222.
POST 11111/api/mailings?
...
- list_id=2222
...
- Having said that, it is best practice to use the list_id in just one place, to reduce human error.
![]() As is the case everywhere in the Ongage platform, when no List ID is indicated, then the default List ID for that account is the one that is used.
As is the case everywhere in the Ongage platform, when no List ID is indicated, then the default List ID for that account is the one that is used.
...
- For adding/updating large amounts of contacts aka bulk import, use this class of API methods: Import API MethodsAPI Methods.
- This is the same CSV import as appears in the UI. This API, enables users to automate imports, rather than upload them manually.
- When adding/updating more than a hundred contacts, and particularly when adding/updating big volumes list data fields, or if you're doing a daily or nightly batch update of your Ongage list, use the POST /api/import command – instead of the of the contacts methods above.
How to Issue a Transactional Email or SMS via the API
- Transactional messages (email or SMS) can be issued using the following API method: POST /api/transactional/send
- Typical scenarios for transactional emails are welcome emails upon registering or a receipt following a purchase transaction.
 To be noted that welcome emails don't have to be API coded, as Ongage offers an automatic built-in welcome email feature, that can be setup from the List Settings Page (see there help section on "How to Setup a List Welcome Email").
- Each List comes with 1 default transactional campaign already setup, but you can add additional campaigns for different types of transactional emails with the following method:
POST api/transactional which is used to create a new transactional mailing campaign. - If you don't indicate a mailing_id when calling the transactional mailing method, then all mailing stats and data will get associated with the default transactional campaign for that list.
- By default when issuing a call to send a transactional message, the contact's status (unsub, bounce, complant status) is ignored, that's in order to accommodate sending receipts regardless if the contact is unsubscribed or not (similarly suppression lists are also ignored). The Transactional method does have flags to indicate whether to take into account the status and/or suppression list . See details about the check_status flag and check_global_and_list_suppression flag under the API method: POST /api/transactional/send
- When issuing a Transactional message you can either indicate the Email/SMS Message ID or Send HTML/Text Content in the body of API Call. In the latter case you will need to encode the HTML code passed in the body of the call by using some function like: json_encode($html-email); (See example here: POST /api/notify_transactions).
...
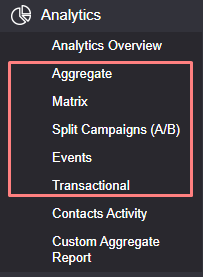
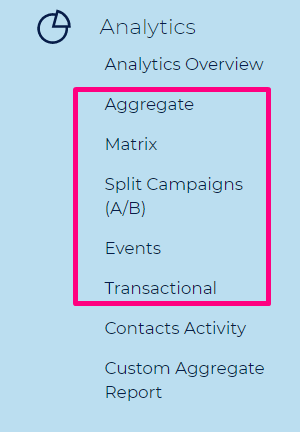
- All of campaign/aggregated analytics reports that you see in the Ongage UI (User Interface), behind the scenes use the Ongage API reporting method: POST /api/reports/query
How can I retrieve the Ongage Contact Activity Report
...
There are 2 methods that can be used:
- GET /api/contacts/by_email/<email address> is a synchronous search using the email address field only (which is the key field and indexed field of the Ongage list).
- POST /api/contact_search is an asynchronous search and is the API called used to generate the Contacts Manager Search. It should be used whenever you're searching your list, for a group of contacts, using a list field other than the email field(e. E.g., search all list members where gender is female.g., State equals NY), or when searching for all contacts that belong to s Segment, etc.
Account Level API Methods
...
How many API calls can I issue per minute
- The default limit is 300 API calls every 60 seconds (i.e., 300 API calls per minute). This limit can be increased (even by a lot), based on your Ongage package. Please consult Ongage support for more information on this matter. The API limit for you account, you can find in your Account → Profile Page, under the 'Account Limits' section of the page see: 'Maximum number of API calls allowed per minute'
- If you issue more API calls beyond the your account limit, you will get a denied response with HTTP 429 error (see below).
- This is done in order to ensure stable and continuous API service.
- Therefore in your code you should have a built-in retry and back-off mechanism, in order to manage that rate, so even if you breach the limit and get denied, you can resend it according to the allowed rate.
- Suggested exponential back-off: 1 minute, 2 minutes, 4 minutes, 8 minutes, 16 minutes.
- If you issue more API calls beyond the your account limit, you will get a denied response with HTTP 429 error (see below).
- Moreover, you can have no more than 10 API calls running in parallel at any given time.
HTTP Error Code 429
See previous section right above this, for the context regarding this error message. Here is what the HTTP 429 error code looks like:
| Code Block |
|---|
{
    "metadata": {
        "error": true
    },
    "payload": {
        "code": 429,
        "errors": [],
        "message": "Calls per minute exceeded"
    }
} |
How to Handle HTTP 5xx Error Codes
...
![]() For a list of all HTTP Error Codes see the Appendix at the bottom of this API Guide
For a list of all HTTP Error Codes see the Appendix at the bottom of this API Guide
Appendix
API Exception response sample
...